Title

Home Canning Fruit and Fruit Products

(FN174, Revised Oct. 2022)
Summary

Processing is essential to ensure safety when canning fruits. Fruits, being acidic foods, can be processed safely in a boiling-water bath. However, some people prefer to pressure-process fruits.

Lead Author
Lead Author:
Julie Garden-Robinson, Ph.D., R.D., L.R.D. Food and Nutrition Specialist North Dakota State University Extension
Availability
Availability:
Available in print from the NDSU Distribution Center.

Contact your county NDSU Extension office to request a printed copy.
NDSU staff can order copies online (login required).

Publication Sections
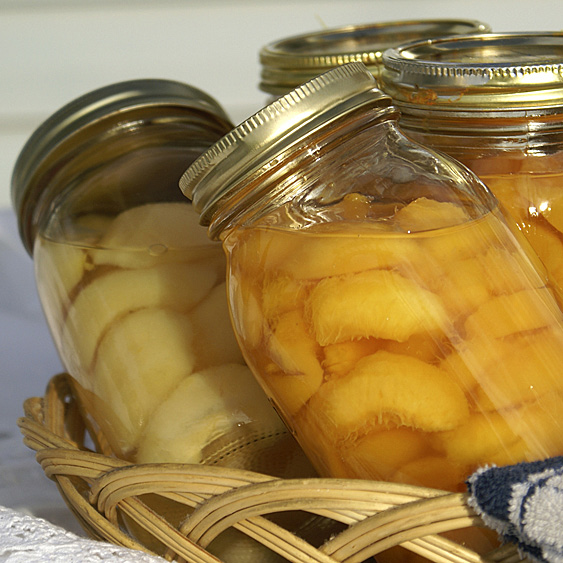
Jars of canned fruit in a basket

Organisms that cause food spoilage – molds, yeasts and bacteria – always are present in the air, water and soil. Also, enzymes that may cause undesirable changes in flavor, color and texture are present in raw fruits. Use recommended processing methods and times when canning fruits to destroy spoilage organisms and stop the action of enzymes. 

General Canning Procedures

Jars and Lids

Mason-type canning jars are the best choice. The standard jar mouth is about 2 3/8 inches. Wide-mouth jars have openings of about 3 inches, making them more easily filled and emptied. Half-gallon jars may be used for canning very acidic juices only.

Most commercial pint- and quart-size mayonnaise or salad dressing jars may be used with new two-piece lids for canning acid foods. However, you may expect more sealing failures and jar breakage. These jars have a narrower sealing surface and are tempered less than Mason jars. Mayonnaise-type jars are not recommended for use with foods that will be processed in the pressure canner.

Use two-piece, self-sealing lids. Buy only the quantity of lids that will be used in a year and follow the manufacturer’s directions for preparing the lids.

Sterilize Jars

To sterilize empty jars, put them right side up on the rack in a boiling-water canner. Fill the canner and jars with hot (not boiling) water to 1 inch above the tops of the jars. Boil 10 minutes at altitudes of less than 1,000 feet. At higher elevations, boil one additional minute for each additional 1,000 feet of elevation. Remove and drain hot, sterilized jars one at a time just before filling. Save the hot water for processing filled jars. Fill jars with food, apply lids and tighten screw bands.

Presterilizing jars for fruits that will be processed 10 minutes or longer in a boiling-water canner is not necessary.

Filling Jars

After filling jars with food, release air bubbles by inserting a flat plastic (not metal) spatula between the food and the inside surface of the jar. Slowly turn the jar and move the spatula up and down to allow air bubbles to escape. Adjust the head space and then clean the jar rim (sealing surface) with a dampened paper towel.

Place the lid, gasket down, onto the cleaned jar sealing surface. Uncleaned jar-sealing surfaces may cause seal failures.

Then fit the metal screw band over the flat lid. Follow the manufacturer’s guidelines enclosed with or on the box for tightening the jar lids properly.

Prevent Darkening

Follow these guidelines to ensure that your canned foods retain optimum colors and flavors during processing and storage:

  • Use only high-quality foods that are at the proper maturity and are free of diseases and bruises.
  • Use the hot-pack method, especially with acidic foods to be processed in boiling water.
  • Don’t unnecessarily expose prepared foods to air. Can them as soon as possible.
  • While preparing a canner load of jars, keep peeled, halved, quartered, sliced or diced apples, apricots, nectarines, peaches and pears in a solution of ascorbic acid. This procedure also is useful for preventing stem-end discoloration in cherries and grapes. You can get ascorbic acid in several forms:

Pure powdered form — seasonally available among canners’ supplies in supermarkets. One level teaspoon of pure powder weighs about 3 grams. Use 1 teaspoon per gallon of water as a treatment solution.

Vitamin C tablets — economical and available year-round in many stores. Buy 500-milligram tablets; crush and dissolve six tablets per gallon of water as a treatment solution.

Commercially prepared mixes of ascorbic and citric acid — seasonally available among canners’ supplies in supermarkets. Sometimes citric acid powder is sold in supermarkets, but it is less effective in controlling discoloration. If you choose to use these products, follow the manufacturer’s directions.

  • Fill hot foods into jars and adjust head space as specified in recipes.
  • Store the jars in a relatively cool, dark place, preferably between 50 and 70 degrees Fahrenheit.
  • Can no more food than you will use within a year.

Sweetening Fruit

Adding syrup to canned fruit helps retain its flavor, color and shape. It does not prevent spoilage of these foods. The guidelines in Table 1 for preparing and using syrups offer a new “very light” syrup, which approximates the natural sugar content of many fruits. Quantities of water and sugar to make enough syrup for a canner load of pints or quarts are provided for each syrup type.

Table 1. Preparing and using syrups.
    Measures of Water and Sugar  
    For 9-pt. Load* For 7-qt. Load  
Syrup Type Approx. % Sugar Cups Water Cups Sugar Cups Water Cups Sugar Fruits commonly packed in syrup**
Very light 10 6-1/2 3/4 10-1/2 1-1/4 Approximates natural sugar level in most fruits and adds the fewest calories.
Light 20 5-3/4 1-1/2 9 2-1/4 Very sweet fruit. Try a small amount the first time to see if your family likes it.
Medium 30 5-1/4 2-1/4 8-1/4 3-3/4 Sweet apples, sweet cherries, berries, grapes
Heavy 40 5 3-1/4 7-3/4 5-1/4 Tart apples, apricots, sour cherries, gooseberries, nectarines, peaches, pears, plums
Very heavy 50 4-1/4 4-1/4 6-1/2 6-3/4 Very sour fruit. Try a small amount the first time to see if your family likes it.

* This amount also is adequate for a 4-quart load.

** Many fruits that typically are packed in heavy syrup are excellent products when packed in light syrup.  We recommended you try lighter syrups because they contain fewer calories from added sugar.

Procedure: Heat water and sugar together. Bring to a boil and pour over raw fruits in jars. For hot packs, bring the water and sugar to boil, add fruit, reheat to boiling and fill into jars immediately.

Other sweeteners: Light corn syrups or mild-flavored honey may be used to replace up to half the table sugar called for in syrups.

Canning Without Sugar

In canning regular fruits without sugar, selecting fully ripe but firm fruits of the best quality is very important. Prepare these as for hot-packs but use water or regular unsweetened fruit juices instead of sugar syrup. Juice made from the fruit being canned is best. Blends of unsweetened apple, pineapple and white grape juice also are good for filling over solid fruit pieces. Adjust head spaces and lids and use the processing recommendations given for regular fruits. Add sugar substitutes, if desired, when serving.

Canning Fruit-based Baby Foods

You may prepare any chunk-style or pureed fruit with or without sugar, using the procedure for preparing each fruit as given in this publication. Pack in half-pint, preferably, or pint jars and use the processing times in Table 2.

Table 2. Process time for fruit-based baby foods in a boiling water-bath canner.
    Process Time at Altitudes of
Style of Pack Jar Size 1-1,000 ft 1,001-6,000 ft
Hot Pints or Half-pints 20 minutes 25 minutes

Water Bath Canners

Water-bath canners are made of aluminum or porcelain-covered steel. They have removable perforated racks and fitted lids. The canner must be deep enough so that at least 1 inch of briskly boiling water will be over the tops of jars during processing. Some boiling-water canners do not have flat bottoms. A flat bottom must be used on an electric range. Either a flat or ridged bottom can be used on a gas burner. To ensure uniform processing of all jars with an electric range, the canner should be no more than 4 inches wider in diameter than the element on which it is heated.

Using Boiling-water Canners

Follow these steps for successful boiling-water canning:

1. Fill the canner halfway with water.

2. Preheat water to 140 F for raw-packed foods and to 180 F for hot-packed foods.

3. Load filled jars, fitted with lids, into the canner rack and use the handles to lower the rack into the water or fill the canner, one jar at a time, with a jar lifter.

4. Add more boiling water, if needed, so the water level is at least 1 inch above the jar tops. Cover the canner.

5. Turn the heat to its highest position until the water boils vigorously.

6. Set a timer for the minutes required for processing the food.

7. Lower the heat setting to maintain a gentle boil throughout the process schedule.

8. Add more boiling water, if needed, to keep the water level above the jars.

9. When jars have been boiled for the recommended time, turn off the heat and remove the canner lid.

10. Using a jar lifter, remove the jars and place them right side up on a towel, leaving at least 1-inch spaces between the jars during cooling.

Do not retighten the lids after processing jars.

Cooling Jars

Cool the jars at room temperature for 12 to 24 hours. Jars may be cooled on racks or towels to minimize heat damage to counters. The food level and liquid volume of raw-packed jars will be noticeably lower after cooling. Air is exhausted during processing and food shrinks. If a jar loses excessive liquid during processing, do not open it to add more liquid. Check for sealed lids as described below.

Testing Jar Seals

After cooling jars for 12 to 24 hours, remove the screw bands and test seals by one of the following options:

Option 1: Press the middle of the lid with a finger or thumb. If the lid springs up when you release your finger, the lid is unsealed.

Option 2: Tap the lid with the bottom of a teaspoon. If it makes a dull sound, the lid is not sealed. If food is in contact with the underside of the lid, it will cause a dull sound. If the jar is sealed correctly, it will make a ringing, high-pitched sound.

Option 3: Hold the jar at eye level and look across the lid. The lid should be concave (curved down slightly in the center). If the center of the lid is either flat or bulging, it may not be sealed.

Reprocessing Unsealed Jars

If a lid fails to seal on a jar, remove the lid and check the jar-sealing surface for tiny nicks. If necessary, change the jar, add a new, properly prepared lid and reprocess within 24 hours using the same processing time. Head space in unsealed jars may be adjusted to 1½ inches and jars could be frozen instead of reprocessed. Foods in single unsealed jars could be stored in the refrigerator and consumed within several days.

Directions for Canning Fruit

Apple Butter

Use Jonathan, Winesap, Stayman, Golden Delicious, Macintosh or other tasty apple varieties for good results.

8 pounds apples

2 cups cider

2 cups vinegar

2¼ cups white sugar

2¼ cups packed brown sugar

2 tablespoons ground cinnamon

1 tablespoon ground cloves

Yield: About 8 to 9 pints

Procedure: Wash, remove stems and quarter and core fruit. Cook the fruit slowly in cider and vinegar until soft. Press the fruit through a colander, food mill or strainer. Cook the fruit pulp with sugar and spices, stirring frequently. To test for doneness, remove a spoonful and hold it away from the steam for two minutes. It is done if the butter remains mounded on the spoon. Another way to determine when the butter is cooked adequately is to spoon a small quantity onto a plate. When a rim of liquid does not separate around the edge of the butter, it is ready for canning. Fill hot apple butter into sterile half-pint or pint jars, leaving ¼ inch of head space. Quart jars need not be presterilized. Adjust the lids and process according to Table 3.

Apple Juice

Quality: Good quality apple juice is made from a blend of varieties.

Safety note: Some older recipes recommend mixing apples with cream of tartar (tartaric acid) and boiling water and allowing the mixture to stand overnight at room temperature. This practice is no longer recommended because of the potential survival/growth of acid-tolerant organisms, including E. coli O157:H7. The U.S. Department of Agriculture recommends purchasing fresh-pressed apple juice and processing as follows:

Procedure: Refrigerate the juice for 24 to 48 hours. Without mixing, carefully pour off clear liquid and discard sediment. Strain the clear liquid through a paper coffee filter or double layers of damp cheesecloth. Heat quickly, stirring occasionally, until the juice begins to boil. Fill immediately into sterile pint or quart jars or fill into clean half-gallon jars, leaving ¼ inch of head space. Adjust the lids and process according to Table 3.

Apples – Sliced

Quantity: An average of 2¾ pounds per quart

Quality: Select apples that are juicy, crispy and preferably both sweet and tart.

Procedure: Wash, peel and core the apples. To prevent discoloration, slice apples into water containing ascorbic acid (see “Prevent Darkening” under General Canning Procedures). Raw packs make poor-quality products. Place the drained slices in a large saucepan and add 1 pint of water or very light, light or medium syrup (see Table 1) per 5 pounds of sliced apples. Boil five minutes, stirring occasionally to prevent burning. Fill jars with hot slices and hot syrup or water, leaving ½ inch of head space. Adjust lids and process according to Table 3, 4 or 5.

Applesauce

Quantity: An average of 3 pounds per quart

Quality: Select apples that are sweet, juicy and crisp. For a tart flavor, add 1 to 2 pounds of tart apples to each 3 pounds of sweeter fruit.

Procedure: Wash, peel and core the apples. If desired, slice apples into water containing ascorbic acid to prevent browning (see “Prevent Darkening” under General Canning Procedures). Place drained slices in an 8- to 10-quart pot. Add ½ cup of water. Stirring occasionally to prevent burning, heat quickly until tender (five to 20 minutes, depending on maturity and variety). Press through a sieve or food mill or skip the pressing step if you prefer chunk-style sauce. Sauce may be packed without sugar. If desired, add c cup of sugar per quart of sauce. Taste and add more, if preferred. Reheat the sauce to boiling. Fill jars with hot sauce, leaving ½ inch of head space. Adjust the lids and process according to Table 3.

Spiced Apple Rings

12 pounds firm, tart apples (maximum diameter, 2½ inches)

12 cups sugar

6 cups water

1¼ cups white vinegar (5%)

3 tablespoons whole cloves

¾ cup red hot cinnamon candies

or 8 cinnamon sticks and 1 teaspoon red food coloring (optional)

Yield: About 8 to 9 pints

Procedure: Wash apples. To prevent discoloration, peel and slice one apple at a time. Immediately cut crosswise into ½-inch slices, remove the core area with a melon baller and immerse in ascorbic acid solution (see “Prevent Darkening” under General Canning Procedures). To make flavored syrup, combine sugar, water, vinegar, cloves, cinnamon candies or cinnamon sticks and food coloring in a 6-quart saucepan. Stir, heat to boiling and simmer three minutes. Drain apples, add to hot syrup and cook five minutes. Fill jars (preferably wide-mouth) with apple rings and hot flavored syrup, leaving ½ inch of head space. Adjust the lids and process according to Table 3.

Apricots – Halved or Sliced

Quantity: An average of 2¼ pounds per quart

Quality: Select firm, well-colored mature fruit of ideal quality for eating fresh.

Procedure: Follow directions for peaches except the boiling water dip; removal of the skin is optional. Wash the fruit if the skins are not removed. Either hot or raw pack and use the same process time on Table 3, 4 or 5.

Berry Syrup

Juices from fresh or frozen blueberries, cherries, grapes, raspberries (black or red) and strawberries easily are made into toppings for use on ice cream and pastries.

Yield: About 9 half-pints

Procedure: Select 6½ cups of fresh or frozen fruit of your choice. Wash, cap and stem fresh fruit and crush in a saucepan. Heat to boiling and simmer until soft (five to 10 minutes). Strain hot fruit through a colander and drain until cool enough to handle. Strain the collected juice through a double layer of cheesecloth or a jelly bag. Discard the dry pulp. The yield of the pressed juice should be about 4½ to 5 cups. Combine the juice with 6¾ cups of sugar in a large saucepan, bring to boiling and simmer one minute. To make a syrup with whole fruit pieces, save 1 or 2 cups of the fresh or frozen fruit, combine these with the sugar and simmer as in making regular syrup. Remove the juice from the heat, skim off the foam and fill into clean half-pint or pint jars, leaving ½ inch of head space. Adjust the lids and process according to Table 3.

Berries – Whole

Blackberries, blueberries, currants, dewberries, elderberries, gooseberries, huckleberries, loganberries, mulberries, raspberries

Quantity: An average of 1¾ pounds per quart

Quality: Choose ripe, sweet berries with uniform color.

Procedure: Wash 1 or 2 quarts of berries at a time. Drain and cap and stem if necessary. For gooseberries, snip off the heads and tails with scissors. Prepare and boil preferred syrup (see Table 1), if desired. Add ½ cup of syrup, juice or water to each clean jar.

Hot pack — For blueberries, currants, elderberries, gooseberries and huckleberries, heat the berries in boiling water for 30 seconds and drain. Fill jars and cover with hot juice, leaving ½ inch of head space.

Raw pack — Fill jars with any of the raw berries, shaking down gently while filling. Cover with hot syrup, juice or water, leaving ½ inch of head space.

Adjust the lids and process according to Table 3, 4 or 5.

Cherries – Whole

Sweet or sour

Quantity: An average of 2½ pounds per quart

Quality: Select bright, uniformly colored cherries that are mature (of ideal quality for eating fresh or cooking).

Procedure: Stem and wash cherries. Remove pits if desired. If pitted, place cherries in water containing ascorbic acid to prevent stem-end discoloration (see “Prevent Darkening” under General Canning Procedures). If canned unpitted, prick skins on opposite sides with a clean needle to prevent splitting. Cherries may be canned in water, apple juice, white grape juice or syrup. If syrup is desired, select and prepare the preferred type (see Table 1).

Hot pack — In a large saucepan, add ½ cup of water, juice or syrup for each quart of drained fruit and bring to boiling. Fill jars with cherries and cooking liquid, leaving ½ inch of head space.

Raw pack — Add ½ cup of hot water, juice or syrup to each jar. Fill jars with drained cherries, shaking down gently as you fill. Add more hot liquid, leaving ½ inch of head space.

Adjust lids and process according to Table 3, 4 or 5.

Nectarines – Halved or Sliced

Quantity: An average of 2½ pounds per quart

Quality: Choose ripe, mature fruit of ideal quality for eating fresh or cooking.

Procedure: Follow directions for peaches, except do not dip in hot water or remove skins; wash; either hot or raw pack; and use the same process time.

Fruit Purees (of any fruit except figs and tomatoes)

Procedure: Stem, wash, drain, peel and remove pits if necessary. Measure fruit into a large saucepan, crushing slightly if desired. Add 1 cup of hot water for each quart of fruit. Cook slowly until the fruit is soft, stirring frequently. Press through a sieve or food mill. If desired for flavor, add sugar to taste. Reheat the pulp to boiling or until the sugar dissolves if added. Fill hot into clean jars, leaving ¼ inch of head space. Adjust the lids and process according to Table 3, 4 or 5.

Caution: These recommendations should not be used with bananas, figs, Asian pears, tomatoes, cantaloupe and other melons, papaya, ripe mango or coconut. No home canning recommendations are available for these products.

Peaches – Halved or Sliced

Quantity: An average of 2½ pounds per quart

Quality: Choose ripe, mature fruit of ideal quality for eating fresh or cooking.

Procedure: Dip fruit in boiling water for 30 to 60 seconds until skins loosen. Dip quickly in cold water and slip off skins. Cut in half, remove the pits and slice if desired. To prevent darkening, keep peeled fruit in ascorbic acid solution (see “Prevent Darkening” under General Canning Procedures). Prepare and boil a very light, light or medium syrup (see Table 1) or pack peaches in water, apple juice or white grape juice. Raw packs make poor-quality peaches.

Hot pack — In a large saucepan, place drained fruit in syrup, water, or juice and bring to a boil. Fill jars with hot fruit and cooking liquid, leaving ½ inch of head space. Place halves in layers, cut side down.

Raw pack — Fill jars with raw fruit, cut side down, and add hot water, juice or syrup, leaving ½ inch of head space.

Adjust the lids and process according to Table 3, 4 or 5.

Peach Apple Salsa

6 cups (2¼ pounds) chopped Roma tomatoes (about 3 pounds tomatoes as purchased)

2½ cups diced yellow onions (about 1 pound or 2 large as purchased)

2 cups chopped green bell peppers (about 1½ large peppers as purchased)

10 cups (3½ pounds) chopped hard, unripe peaches (about 9 medium peaches or 4½ pounds as purchased peaches)

2 cups chopped Granny Smith apples (about 2 large apples as purchased)

4 tablespoons mixed pickling spice

1 tablespoon canning salt

2 teaspoons crushed red pepper flakes

3¾ cups (1¼ pounds) packed light brown sugar

2¼ cups cider vinegar (5 percent)

Yield: About 7 pints

Procedure: Wash and rinse canning jars; keep hot until ready to use. Prepare lids according to manufacturer’s directions. Place pickling spice on a clean, double-layered, 6-inch-square piece of 100 percent cheesecloth. Bring the corners together and tie with a clean string. (Or use a purchased muslin spice bag). Wash and peel tomatoes. Chop into ½-inch pieces. Peel, wash and dice onions into ¼-inch pieces. Wash, core and seed bell peppers; chop into ¼-inch pieces. Combine chopped tomatoes, onions and peppers in an 8- or 10-quart Dutch oven or saucepot. Wash, peel and pit peaches; cut into halves and soak for 10 minutes in an ascorbic acid solution (1,500 milligrams in ½ gallon of water). Wash, peel and core apples; cut into halves and soak for 10 minutes in an ascorbic acid solution. Quickly chop peaches and apples into ½-inch cubes to prevent browning. Add chopped peaches and apples to the saucepot with the vegetables. Add the pickling spice bag to the saucepot; stir in the salt, red pepper flakes, brown sugar and vinegar.

Hot pack — Bring the mixture to boiling, stirring gently to mix ingredients. Reduce the heat and simmer 30 minutes, stirring occasionally. Remove the spice bag from the pan and discard. With a slotted spoon, fill salsa solids into hot, clean pint jars, leaving 1¼ inches of head space (about ¾ pound of solids in each jar). Cover with cooking liquid, leaving ½ inch of head space. Remove air bubbles and adjust head space if needed. Wipe the rims of the jars with a dampened, clean paper towel; apply two-piece metal canning lids.

Process in a boiling-water canner according to the recommendations in Table 3.
Pears – Halved

Quantity: An average of 2½ pounds per quart

Quality: Choose ripe, mature fruit of ideal quality for eating fresh or cooking.

Procedure: Wash and peel pears. Cut lengthwise in halves and remove the core. A melon baller or metal measuring spoon is suitable for coring pears. To prevent discoloration, keep pears in an ascorbic acid solution (see “Prevent Darkening” under General Canning Procedures). Prepare a very light, light or medium syrup (see Table 1) or pack pears in apple juice, white grape juice or water. Fill jars with hot fruit and cooking liquid, leaving ½ inch of head space. Adjust the lids and process according to Table 3, 4 or 5.

Plums – Halved or Whole

Quantity: An average of 2 pounds per quart

Quality: Select deep-colored, mature fruit of ideal quality for eating fresh or cooking. Plums may be packed in water or syrup.

Procedure: Stem and wash plums. To can whole, prick the skin on two sides of the plums with a fork to prevent splitting. Freestone varieties may be halved and pitted. If you use syrup, prepare very light, light or medium syrup (see Table 1).

Hot pack — Add plums to the hot syrup and boil two minutes. Cover the saucepan and let the plums stand 20 to 30 minutes. Fill jars with hot plums and cooking syrup, leaving ½ inch of head space.

Raw pack — Fill jars with raw plums, packing firmly. Add hot syrup, leaving ½ inch of head space.

Adjust the lids and process according to Table 3, 4 or 5.

Rhubarb - Stewed

Quantity: An average of 1½ pounds per quart

Quality: Select young, tender, well-colored stalks from the spring or late-fall crop.

Procedure: Trim off leaves. Wash stalks and cut into ½-inch to 1-inch pieces. In a large saucepan, add ½ cup of sugar for each quart of fruit. Let the fruit stand until juice appears. Heat gently to boiling. Fill jars without delay, leaving ½ inch of head space. Adjust the lids and process according to Table 3, 4 or 5.

Zucchini Pineapple

4 quarts cubed or shredded zucchini

46 ounces canned unsweetened pineapple juice

1½ cups bottled lemon juice

3 cups sugar

Yield: About 8 to 9 pints

Procedure: Peel zucchini and either cut into ½-inch cubes or shred. Mix zucchini with the other ingredients in a large saucepan and bring to a boil. Simmer 20 minutes. Fill jars with hot mixture and cooking liquid, leaving ½ inch of head space. Adjust the lids and process according to Table 3.

Recommended Process Times

Table 3. Recommended process times for acid foods in a boiling water-bath canner.
      Process Times (minutes) at Altitudes of
  Style of Pack Jar Size 0-1,000 ft 1,001-3,000 ft 3,001-6,000 ft Above 6,000 ft
Apple Butter Hot Half Pints or Pints 5 10 10 15
    Quarts 10 15 15 20
Apple Juice Hot Pints or Quarts 5 10 10 15
    Half-gallons 10 15 15 20
Apples, sliced Hot Pints or Quarts 20 25 30 35
Applesauce Hot Pints 15 20 20 25
    Quarts 20 25 30 35
Spiced apple rings Hot Half-pints or Pints 10 15 15 20
Berries, whole Hot Pints or Quarts 15 20 20 25
  Raw Pints 15 20 20 25
    Quarts 20 25 30 35
Berry, syrup Hot Half-pints or Pints 10 15 15 20
Cherries, whole, sour or sweet Hot Pints 15 20 20 25
    Quarts 20 25 30 35
  Raw Pints or Quarts 25 30 35 40
Fruit purees Hot Pints or Quarts 15 20 20 25
Peaches, apricots & nectarines - halved or sliced Hot Pints 20 25 30 35
    Quarts 25 30 35 40
  Raw Pints 25 30 35 40
    Quarts 30 35 40 45
Peach apple salsa Hot Pints 15 20 20 25
Pears, halved Hot Pints 20 25 30 35
    Quarts 25 30 35 40
Plums - halved or sliced Hot and Raw Pints 20 25 30 35
    Quarts 25 30 35 40
Rhubarb, stewed Hot Pints or Quarts 15 20 20 25
Zucchini pineapple Hot Half-pints or Pints 15 20 20 25
Table 4. Process times for some acid foods in a dial-gauge pressure canner.
        Canner Pressure (PSI) at Altitudes of
Type of Fruit Style of Pack Jar Size Process Time (min.) 0-2,000 ft 2,001-4,000 ft 4,001-6,000 ft
Applesauce Hot Pints 8 6 lb 7 lb 8 lb
    Quarts 10 6 lb 7 lb 8 lb
Apples, sliced Hot Pints or Quarts 8 6 lb 7 lb 8 lb
Berries, whole Hot Pints or Quarts 8 6 lb 7 lb 8 lb
  Raw Pints 8 6 lb 7 lb 8 lb
    Quarts 10 6 lb 7 lb 8 lb
Cherries, whole, sour or sweet Hot Pints 8 6 lb 7 lb 8 lb
    Quarts 10 6 lb 7 lb 8 lb
  Raw Pints or Quarts 10 6 lb 7 lb 8 lb
Fruit purees Hot Pints or Quarts 8 6 lb 7 lb 8 lb
Peaches, apricots and nectarines Hot and raw Pints or Quarts 10 6 lb 7 lb 8 lb
Pears, halved Hot Pints or Quarts 10 6 lb 7 lb 8 lb
Plums Hot and raw Pints or Quarts 10 6 lb 7 lb 8 lb
Rhubarb, stewed Hot Pints or Quarts 8 6 lb 7 lb 8 lb
Table 5. Process times for some acid foods in a weighted-gauge pressure canner.
        Canner Pressure (PSI) at Altitudes of
Type of Fruit Style of Pack Jar Size Process Time (min.) 0-1,000 ft Above 1,000 ft
Applesauce Hot Pints 8 5 lb 10 lb
    Quarts 10 5 lb  10 lb
Applies, sliced Hot Pints or Quarts 8 5 lb  10 lb
Berries, whole Hot Pints or Quarts 8 5 lb  10 lb
  Raw Pints 8 5 lb  10 lb
    Quarts 10 5 lb  10 lb
Cherries, whole, sour or sweet Hot Pints 8 5 lb  10 lb
    Quarts 10 5 lb  10 lb
  Raw Pints or Quarts 10 5 lb  10 lb
Fruit purees Hot Pints or Quarts 8 5 lb  10 lb
Peaches, apricots and nectarines Hot and raw Pints or Quarts 10 5 lb  10 lb
Pears, halved Hot Pints or Quarts 10 5 lb  10 lb
Plums Hot and raw Pints or Quarts 10 5 lb  10 lb
Rhubarb, stewed Hot Pints or Quarts 8 5 lb  10 lb

Adjust for Altitude

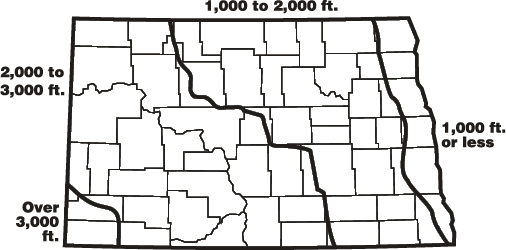
As altitudes increase, air becomes thinner, and this affects both pressures and boiling points in home canning. Using the water-bath process times for canning food at sea level may result in spoilage if you live at altitudes of 1,000 feet or more. Water boils at lower temperatures as altitude increases. Lower boiling temperatures are less effective for killing bacteria. Increasing the processing time or canner pressure compensates for lower boiling temperatures. Select the proper processing time and canner pressure for the altitude where you live.

The altitude in North Dakota varies from 800 feet above sea level in the east to 3,000 feet in the west. The map below shows the approximate altitude of areas of North Dakota.

North Dakota Elevation Map: Altitude ranges from 800 feet in the east to 3,000 feet in the west.
North Dakota Elevation Map - Altitude in North Dakota varies from 800 feet above sea level in the east to 3000 feet in the west.

For more specific information regarding altitude in your county, contact your county Extension office.

Source: Based on “Complete Guide to Home Canning,” Agriculture Information Bulletin 539, 2006 revision, and information from the National Center for Home Food Preservation, University of Georgia, Athens, Ga.

The information given herein is for educational purposes only. Reference to commercial products or trade names is made with the understanding that no discrimination is intended and no endorsement by the Extension is implied.