North Dakota 4-H Livestock Showmanship Guide
(GB092 Revised July 2023)Showmanship is the art of feeding, training, fitting, grooming and showing animals to bring out their best characteristics to make them more presentable in competitive exhibitions. This is not a rule book, but a guide to help youth learn the standard methods of showing livestock, specifically beef, dairy, sheep, goats, swine, poultry and rabbits.
Showmanship contests are based on preparation of the animal, the animal’s apparent training, and the appearance and abilities of the showperson. Animal conformation should not be considered unless it affects the way an animal is fitted and shown.
Fine or technical points need not be overemphasized to the point they are given more weight than the effective presentation of a clean and well-trained animal. Minor infractions should not result in disqualification of an exhibitor. Example: turning the wrong way.
In any showmanship contest, the judge’s decision is final. The judge may use different criteria than what is in this guide in selecting top show exhibitors.
For showmanship videos, visit the NDSU Extension 4-H YouTube channel.
Contact your county NDSU Extension office to request a printed copy.
NDSU staff can order copies online (login required).
North Dakota State Fair
Refer to the North Dakota State Fair 4-H Division Exhibit list for show rules, animal ownership/lease date requirements and regulations for your animal. As an exhibitor, you are responsible for reading the rules prior to your show. Contact your local Extension agent to learn more.
Fitting and Showing Beef Cattle
Preparing Your Beef Animal for Show Day

- Select a beef animal with correct conformation and breed characteristics.
- Begin training your calf with a nylon halter at least three months before the show.
- Tie calves with a slip knot for easy release if the calf needs to get free from a struggle. When halter breaking, tie your animal short with the nose somewhat up to help train it to keep its head up.
- Lead the calf on soft ground, not gravel or pavement, when training to avoid any lameness injuries.
- Lead the calf every day until it is well-trained and comfortable with being led.
- Developing a routine with your calf will help reduce stress on the animal. Excess stress on your calf could cause it to go off feed.
- After the calf is trained to lead, teach the calf to stand using a show stick. Use calm, deliberate strokes; do not “saw” your animal with rapid movements. Some animals may require using the show stick to apply pressure over the loin to drop the topline and provide a more preferred look from the side profile. Conversely, gentle pressure on the underline of the belly can assist with correcting a topline that may be weak in appearance.
- Practice with a leather show halter at least two weeks before the show.
- Slowly increase the amount of time your calf is tied. Tying the calf up during the day with appropriate rest and letting it loose in the evening is best. This can help give animals more stamina for show day. Never leave the tied calf unattended. An unwatched calf has a greater risk of injury.
- Practice leading your calf in and out of a trailer and take your animal for a ride in the trailer, if possible.
 Figure 1. Parts of a beef animal
Source: Ohio State University Extension, outreach arm of the College of Food, Agricultural, and Environmental Sciences
Appearance of Calf
Beef Calves
- Begin rinsing your calf several months before the show. Rinsing helps remove dull/dead hair and stimulates new hair growth. A mild soap can be used, but completely rinse the animal’s body following each use. Soap residue dries the skin, causing dandruff. Getting all the soap out is important! Washing can remove natural oils from the hair, making the hair look loose, dry and fuzzy. You may use conditioners to restore oils to the hair/skin.
- You can use whiteners to lighten tough stains. Never use bleach or other chemicals that may cause damage to the hair coat or cause irritation to the animal’s skin. You can use whitening shampoo to brighten stained areas of white hided cattle. Wash the tail several times before the show. Use a soft-bristled brush or comb to untangle the tail hair as part of your daily hair care routine. Avoid pulling out hair.
- After rinsing, use the flat edge of the scotch comb to scrape the excess water out and then brush all the hair down. This will get all the hair initially going the same direction.
 Figure 2. Direction hair should be brushed and blown on the legs and body after rinsing.
 - Next, begin brushing the hair forward and slightly upward to start training the hair to grow up and out as seen in Figure 2. A rice root brush is a good tool for training hair. Tail-head hair, as well as the hair on the rest of the body, needs to be trained forward.
- You can brush your animal completely dry or use a blower. Making sure the nozzle of the blower is not pointed at the dirt, begin blowing the calf at the shoulder, as shown in Figure 2, blowing hair forward and slightly upward as you move to the rear of the animal. Blow the hair in the same direction you brushed it. This will begin to train the hair.
- Trim and shape hooves to enable the animal to walk and stand naturally. Do not trim too short or make incorrect angles because this could cause the animal to go lame. This should be done at least two weeks prior to the show to ensure calves do not become sensitive and potentially lame prior to the show. Ask a professional for help because experience in this matter is very important.
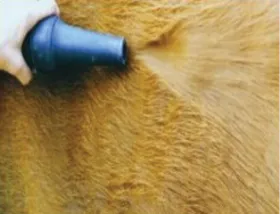
The direction the hair should be brushed and blown on the legs and body after rinsing is important to consider. Be consistent in blow drying. Start drying from the front of animal and work your way back.
Source: Illustrations used with permission from Celina (Johnson) Phillips, Chico State University
Clipping Beef Calves
- Major clipping is done one to two weeks before the show to allow time for some regrowth. This depends on breed and hair growth.
- Complete the final clipping just before the show. Smoothly blend the clipped and unclipped hair so the clipper lines do not show.
- Avoid clipping eyelashes and nose hair.
- See Figure 3 for tips in clipping a beef animal. In general, clip from the poll forward on the head of your animal and then from the base of the ear toward the jawbone, blending this down into the dewlap and brisket. Some breeds may have specific standards. Steers usually have their heads clipped completely.

Clip the head close, using a downward motion from poll to nose. Minimize the shoulder by clipping it and blending with the neck. Create a smooth topline from poll through the tailhead. Blend the shoulder and topline with the body hair. You will want to leave as much hair as possible on the body to enhance the volume and capacity of the animal. Clean up the brisket and in front of the sheath/navel. Leave some hair in the flank area to add depth to your animal. Like the topline, you want a smooth line from brisket to cod/udder. From the rear, clip from the center out to enhance your animal’s natural muscle. Tail (switch) should fill in the hollow here.
Showmanship in the Ring
Leading

- Lead the calf from the left side; hold the lead strap in your right hand at the height of the calf’s head. Hold the strap about 4 to 6 inches from the head to have good control of the animal. Do not coil the strap or wrap it around your hand for safety reasons. Holding the show stick in your left hand when walking.
- Hold the show stick in your left hand and point it downward while on the move. If the show stick is held in front of the calf to aid in control of the calf, be sure you have control of the show stick and do not create a safety issue to others in the show ring. The show stick should be pointing down when leading and when the calf is cooperating.
- Lead the calf at a comfortable pace with the animal’s head held high enough for impressive style, attractive carriage and graceful walking. Watch your animal to understand what it’s “normal gait” is and try to lead your animal at that pace. Leading too fast or too slowly could indicate lack of control and present your animal in an undesirable fashion.
- For a show, you will use a beef show halter that is fitted properly. A beef show halter is usually leather with a chain on the lead. The noseband must fit across the bridge of the nose midway between the eyes and muzzle. Practice with the show halter a couple of weeks before the show to get your calf accustomed to the chain lead.
- Striking the animal in the ring is never permitted and may result in disqualification.

*Do not tuck a show stick under your arm because this could become unsafe if the animal were to bolt forward. The stick could injure your ribs, arm, etc.
Posing in Ring
- When pulling into line, leave about 3 feet between you and the calf to your left.
- Face the calf, switch the lead strap to your left hand and the show stick to your right hand. Stand to the side, not directly in front of your calf and never cross the face of your animal.
- The show stick or your foot may be used to set the calf’s feet correctly. To avoid injury to the showman do not use your foot to set up the calf if this method has not been practiced prior to the show.
- Keep your calf’s front legs even. They may be square or offset with the show side farther back while in line. The side profile look should always have the show (right) side with the rear leg farther back and the left side slightly underneath the
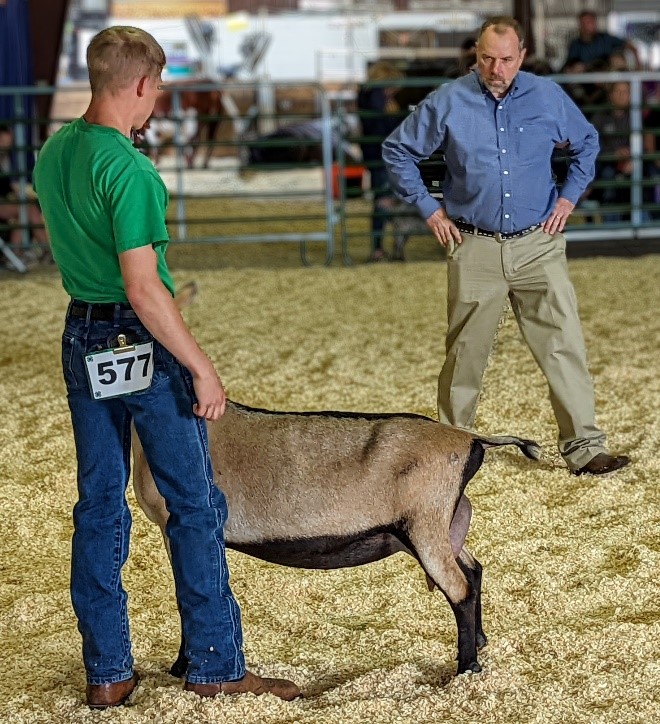
 Photo Credit:Richard Schmidt, NDSUFigure 5. Side profile in beef showmanship.
 - Always move quickly and smoothly to your new position when given the signal by a judge or ring steward.
- When moving your animal into a new position, lead the animal forward then come back through the same spot, toward the rear of the line, turning into your animal (Figure 6). When you are turning to the right, turn into your animal. Never pull the calf toward you unless you are moving left. You can pull the calf toward you when you lead into the new position from the rear of the line.
- After the judge handles the calf, use a scotch comb or flat plastic comb to reposition the hair on the calf. Then put the comb in your pocket or holster. If you are using a scotch comb, keep the teeth turned inward to ensure the calf is not spooked unnecessarily or harmed.
- A successful showperson will have a well-trained calf that poses in the ring without unnecessary movement.
- Always follow the directions of the show superintendent, the ring steward and judge while in the show ring and during the show.
Figure 6. Moving animals to new positions.
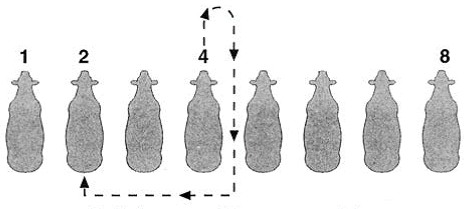
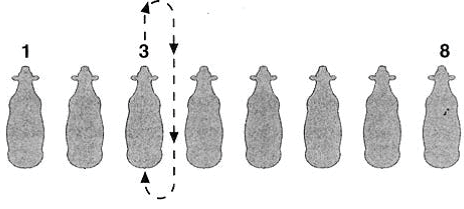
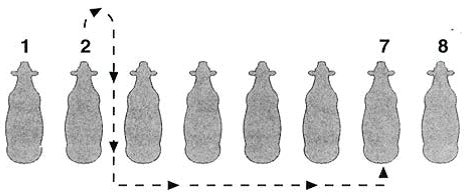
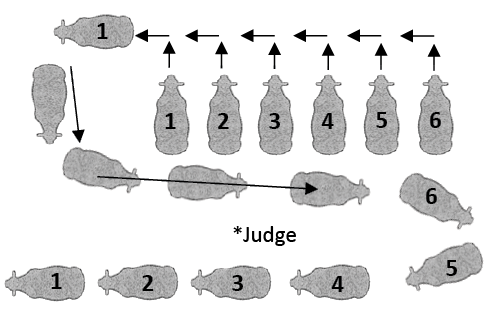
Serpentine Motion: Pull forward out of line, following in order. Lead directly behind the line you were just in, keeping your animal between you and the judge. Make a circle around the judge. Everyone will follow in order. Line up head to tail following the directions of your ring steward.
Source: Mississippi State University, edited by NDSU
Exhibitor as a Showman (Beef, Sheep and Goats)
Review
- Animal – The animal must be set up at all times.
- Judge – Know where the judge is at all times.
- You – Look like you enjoy being in the show ring.
Figure 6 (on page 12) shows how to move your animal in a line for beef, goats and sheep.
During showmanship, the exhibitors should keep the animal between the judge and themselves.
Patterns of Position
The pattern is determined by the judge and/or show management and may differ from those shown here. Pay attention to your judge and your ring steward. Watch other classes ahead of your class to learn from 4-H peers as the judge moves animals within each class to gain an idea of what pattern the judge is using for that day.
Patience in Line
Once animals are in line, either side by side or head to tail, do your best not to move unnecessarily. Animals that fidget or cannot stand still are signs the animal is not well trained. Practice standing still to gain patience for you and your animal while at a show.

Fitting and Showing Dairy Cattle
Preparing the Dairy Calf for Show Day
- Select your show calf several months before the show. Begin halter breaking and put the calf on a feed program to make it look its best. Animals that go off feed before a show will look faint or lethargic and not show well.
- Shelter the animal from the hot sun and control flies several weeks before the show. If possible, keep heifers inside during the day and outside at night.
- Begin rinsing the animal several weeks before the show. This will help remove the dead/dull hair. Be sure to rinse thoroughly because leftover soap can appear as dandruff. Also, washing too often may cause the hair to be dry.
- Clean the ears with a damp or wet cloth.
- Always brush dairy cattle with a rubber curry or long bristle comb, never a steel curry comb. Start brushing/grooming your heifer at least three weeks before the show.
- Avoid overconditioned the animal. Dairy cattle that get fleshy do not show as well and may be faulted.
- Hoof care is important to keep the dairy animal sound. Hoof trimming should be done by someone with experience. Ask a professional for help, if needed.

Showmanship in the Ring
Leading
- Use a dairy show halter that is fitted properly. A dairy show halter is usually leather with a chain on the lead. The noseband needs to fit across the bridge of the nose midway between the eyes and muzzle. A leather halter with leather or chain lead is preferred in the show ring. Train the calf using a nylon halter. Practice with the show halter a couple of weeks before the show to get your animal accustomed to the chain lead.
- Enter the ring walking forward and leading at a natural pace around the ring in a clockwise direction. Walk on the left side, with the left hand on the halter. Do not wrap the lead strap around your hand.
- Once all animals are in the ring, you will lead by walking backward slowly, facing the animal. Hold the lead strap in your left hand with the remainder of it neatly, but naturally, gathered in one or both hands. At all other times, walk forward at a quicker pace. When given the signal to pull into line, move quickly to that position in the ring. Lead at a comfortable pace with the animal’s head held high enough for an impressive style, attractive carriage and graceful walking.
- Position the animal with the halter as much as possible. You can apply pressure on the lead strap and point of shoulder to back the animal. This is essential to walk your animal into place with only minor adjustments necessary.
- Respond quickly, but natural to the judge’s or ring steward’s commands.
- Practice setting up your heifer at home so that you can maneuver easily in the show ring.
- Striking the animal in the ring is never allowed and may result in disqualification.
- Grabbing the skin of the throatlatch of the heifer will showcase a trimmer, cleaner throatlatch to the judge. Do not pull hard or it could make the heifer uncomfortable.
Exhibitor
- 4-H Dress Code – See Page 6.
- Equipment should include a properly fitted dairy halter.
- Exhibitors should have a basic knowledge of their project: age of animal, dairy breeds, breed of their project, feed ration and other general dairy information.
- Be courteous to other exhibitors.
Basic pieces of equipment that may be used for training and showing your dairy animal include:
Necessary
Electric clippers
Nylon halter
Dairy show halter
Soft-bristle brush
Comb for tail
Rubber Curry comb
Pail for water
Hay
Feed
Show box
Optional
Show adhesive
Hair conditioner
Baby powder
Baby oil


Moving dairy animals to new positions.

Animals will walk clockwise into the arena. Exhibitors walk into ring facing forward until all animals are in the ring. Once all animals are in, exhibitors turn toward their animal and start walking backward. Once all animals are in, the judge will line up animals side by side. The first animal pulled into line determines the line you will follow. When pulling into line, leave about a foot distance between you and your fellow exhibitor. Set the legs on your animal.

The judge may place animals in line. You then will lead out of the line in the order of placing. The placings then will form the new line.
Fitting and Showing Sheep
Preparing Your Sheep for Show
- Begin feeding your lamb with a complete show feed at least two months before the show. An early transition to show feed is preferred. You may want to visit with a local nutritionist or feed consultant to determine a ration that fits your goat’s needs.
- Feed your lamb a ration to target your animal’s weight for the first show. Lambs will gain .5 to 1 pound per day, depending on the diet and genetics. The minimum weight for market lambs is 90 pounds.
- Modify feed type as little as possible if the lamb is consuming adequate rations.
- Provide adequate fresh, cool water at all times.
- Begin training the sheep several weeks before the show. Practice walking with and without other sheep, if
 Figure 6. Parts of a sheep.
 - Practice having your market lamb brace against your leg. The lamb’s front feet must remain on the ground when braced. The feet may be lifted slightly to set the front legs only.
- Do not slap your lamb to get the lamb to brace. Your actions represent the industry, so be a positive role model.
- Never tie your lamb up and leave it unattended.
- Use your own feed pans/troughs and pails; do not share with others. This prevents contamination of equipment and reduces disease transmission.
Showmanship in the Ring
Leading

- Working with your lamb regularly is important so it responds quickly, calmly and smoothly to your prompts and cues.
- Enter the ring leading the animal in a clockwise direction, walking beside the head on the left side of the animal.
- Your left hand should remain on the chin, not the throat. Place your right hand behind the point of the ears when the sheep is leading well. You can use the dock to help move the sheep when it is being stubborn.
- Always keep the lamb between you and the judge. If the judge is on the left side of the lamb, calmly switch sides around the front of the lamb. Never go behind the lamb to switch sides. Place your right hand on the jaw and the left hand behind the ear.
- Move the animal at a comfortable pace with its head held high enough for an impressive style, attractive carriage and graceful walking.
Sheep Halters

- Cable halters are utilized in the showring for those that would like to have some more control over the lamb or to just give the animal a more natural look.
- To be successful using a cable halter, the showman must be aware of where the halter is at all times from the minute they lead or pull into brace.
- When utilizing a cable halter, make sure you hold the cable high enough to maintain tension on the halter to prevent the lamb from escaping. Walk with the cable halter above the lamb’s head to show off their front-end design as well as to keep pressure on their head as you lead.
- When stopped and bracing, attention should be focused on head and neck placement. Do not let the halter be a distraction for yourself, the lamb, or the judge.
- When the judge circles around the animal, utilize the cable halter to get off the lamb to show off the front view of that animal. When the judge maneuvers around your lamb to the side profile, begin bracing your lamb and use your hands to secure the animal’s head.
Posing/Moving

at a 90-degree angle, ears propped up and nose angled forward and down for bracing
- As the judge studies your animal, make sure the animal’s head is raised and the animal is positioned correctly. Ensure legs are placed squarely and directly under the animal.
- Market animals are braced; front legs may be lifted slightly and quickly to position the front feet. Bracing lambs should have rear legs set squarely from behind (shown in picture).
- NEVER slap your market lamb to make it brace. Market lambs are braced to enhance muscle expression. Over-bracing results in a break or weak hip/loin junction of the lamb.
- The neck should come out perpendicular to the topline. Pressure can be put on the back of the ears. Allow the nose to drop down to a comfortable position.
- Sheep showmanship: When exhibitors are required to change sides, they must move around the front of the sheep, always facing the animal. Do not step behind the sheep. Exhibitors may move between the sheep and judge for a brief moment to position themselves on the correct side. The sheep should not be completely turned around just to keep it between the exhibitor and the judge. When switching sides, do so naturally, not abruptly.
- Breeding sheep may or may not be braced. Slick shorn meat breeds such as Southdown, Shropshires, Hampshires, Suffolks or Dorsets are commonly held with a brace.
- Wool breed sheep and fitted meat breeds are not braced. Their feet should be set comfortably at all corners. To set the legs squarely under the sheep, place the hind left leg parallel with the right and set the front legs by reaching over the sheep or under the sheep. Setting the legs with your hand is always preferred, but young show people may use their feet, if necessary, to square up the animal.

at a 90-degree angle, ears propped up and nose angled forward and down, without bracing for side profile.
- Exhibitors of breeding sheep should keep their body about 6 inches away from the sheep when standing in line.
- Lifting (keeping the front feet off the ground), striking or abusing an animal is never allowed and may result in disqualification. Exhibitors are role models for the industry and must show respect and appreciation for their animals.
- Avoid crowding/bumping into other animals in line. Leave adequate space between your animal and the animals around you, but do not leave too much space.
- Avoid overshowing and unnecessary maneuvering of the animal. Your attention to detail can become distracting for the judge.
- Recognize conformational faults of the animal and learn how to show your animal to minimize those faults.
- See Figure 6 on page 12 for diagrams on how to change positions in line. Remember to always place the sheep between you and the judge so the judge has a good view of the sheep’s entire body at all times. When the judge steps in front of your sheep, open the view by lifting its head and stepping off to the side so the judge can see the chest and leg structure. Once the judge passes in front of your animal and is two or three sheep past, naturally move to the opposite side without hindering their front view of the sheep.

shoulder at a perpendicular angle.


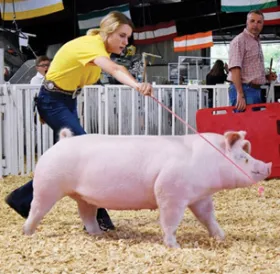
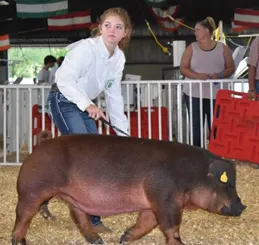
Fitting and Showing Swine
Preparing Your Pig

- Feed the pig a balanced ration several months before the show season begins.
- Select a pig that will reach market weight by the time of your most targeted shows. If a pig is to be shown at 250 pounds, a 60-pound pig will need 100 to 120 days to reach that weight. A pig’s typical growth rate is between 1.55 and 2 pounds a day. Preferably, your pig isn’t over- or under-conditioned at show time.
- Avoid leaving your pig for long periods in hot sunlight. Pigs do not sweat and they sunburn easily.
- Be sure that they have plenty of fresh, cool water at all times.
Grooming

- Brush the hair in the direction that it naturally grows.
- You may use several hair products to give your pig a more attractive, shiny appearance.
- Oil-based skin conditioner may be applied if skin is dry and flaky.
- Misting a pig with water on warm days is appropriate.
- Clipping around the ears, face and tail is recommended. Body clipping is common, especially with breeding hogs. The hair on the pigs should appear fresh, which may require clipping several days before the show (consult show guidelines as they may change from one show to the next).
Showmanship of Swine
Showing

showing. Help those around you to grow and be a mentor to those around you.
- Enter the ring with the animal at a slow walk.
- Use appropriate equipment: a whip 36 to 48 inches in length that suitably fits the showperson and a small brush. Standing at the hip of the hog, the showperson should be able to reach the jaw of the animal with the length of the whip.
- Keep the pig between you and the judge. Leave 10 to 15 feet between the pig and the judge.
- Keep the pig moving, but at a slow pace; it never should run.
- Avoid slapping the pig from the shoulder to the ham.
- Restrain the pig from fighting with others, if possible.
- As the judge studies your animal, make sure that it is on the move and relaxed.
- When turning the pig, step up in front and turn the pig’s head toward you by placing the bat/whip on the opposite side of the head. Sometimes turning may require moving the pig away from you.
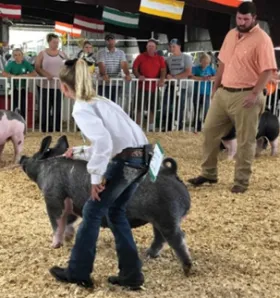
 Photo Credit:Brian Zimprich and Leigh Ann Skurupey, NDSUKeep your eyes on the judge. This shows confidence. More importantly will help you and your pig be in the proper position in the showring.
 - Avoid using the whip excessively.
- Only use a whip to guide the pig; avoid using your hands or legs.
- If your pig happens to get dirty during showing, utilize your brush to remove any debris or dirt, and return the brush back into your pocket.
- If the pig defecates, remove any fecal material from the back end of your pig with your brush.
- Avoid letting your pig crowd. The pig will show better when it is on the move and in open space. This allows judge to see the whole animal.
- If the judge has questions for you, let the pig go, answer the questions, then return to your animal and resume showing.
- If your pig takes off in a run, do not chase it, but continue to walk calmly until it settles down.
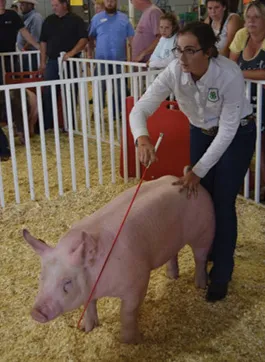
put pressure on the animal, causing it to stop moving.
correct position, being at the hip of the pig.
Fitting and Showing Goats
Preparing Your Goat
- Select your goat and begin training several weeks prior to the first show.
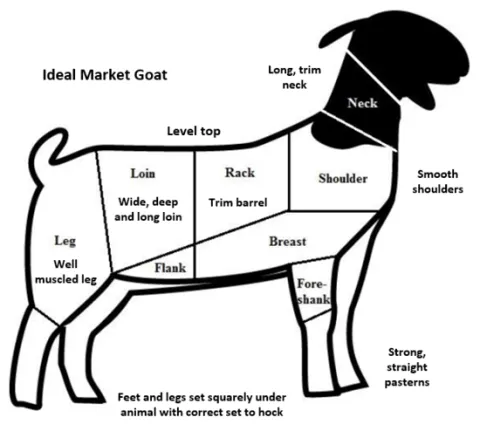
 Photo Credit:GBG091 Goat Showmanship ManualFigure 8. Parts of a goat.
 - Begin feeding your goat with a complete show feed at least two months before the show. An early transition to show feed is preferred. You may want to visit with a local nutritionist or feed consultant to determine a ration that fits your goat’s needs.
- Do not change feed rations unless you have a problem with palatability or consumption.
- Goats will gain between .25 and .50 pound per day, depending on feed and the goat’s genetics.
- Provide fresh, cool water at all times.
- Get your goat accustomed to leading with a halter, collar or chain. This will take some practice. When you begin training, having your goat follow a trained goat may help speed up the training process.
- Be gentle when training. You may pull on the tail gently to assist in moving the goat.
- Avoid long periods of direct sunlight on slick sheared goats to avoid sunscald.
- Goats may be “blown out” using a commercial blower to remove dirt and debris. Cleaning and blowing the animal’s coat helps keep clippers sharp and provides a more even fit job.
- Clip the goat several days (or about one week) prior to the show to allow some hair growth and lessen the visibility of clipper marks.
- Clipping diagrams are available to help determine hair length on different areas of the goat. Hair is left on the head and legs in market and breeding classes.
- Do not leave the goat tied up when unattended.
- Goats should be washed thoroughly with a mild soap and rinsed thoroughly before fitting.
- We recommend that you use a conditioner after washing to replenish body oils.
- Do not get water in the goat’s ears.
- Market goats are usually slick sheared except for the legs a few days prior to the show.
- Meat breeding goats are fitted. Take the front one-third tight and blend to the rest of the body that can be fitted longer throughout.
Showmanship of Goat

- In goat showmanship, use a choker chain or collar; some chains may have a size-adjustment clip. A properly fitted chain/collar will not slide over the horn/head when the animal is exhibited.
- Never Lift (front feet off the ground), strike or abuse your animal. This may result in disqualification.
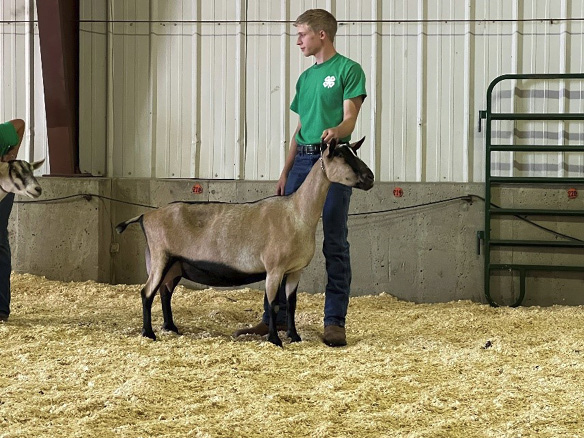
- Enter the ring leading the goat in a clockwise direction. Keep the goat between you and the judge at all times.
- Move the animal at a comfortable pace with head held high for impressive style.
- Never move around the backside of the goat when switching sides.
- When the judge studies your animal, be sure that the goat’s head is raised and the goat is set squarely on all four corners/legs.
- In goat showmanship, you may move your goat and lead from the left or right side, always keeping the goat between you and the judge.
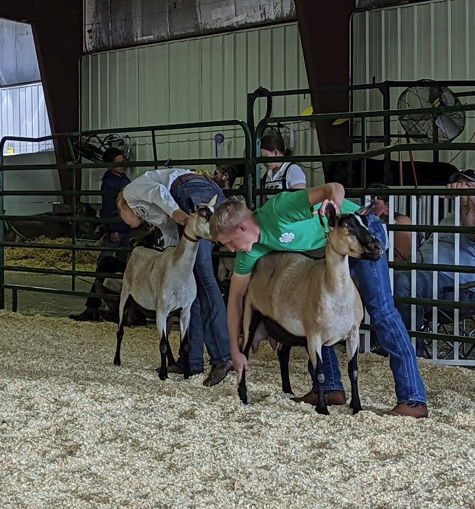
- Hold the head of the goat up with the chain/collar as pictured to the right. The goat can push into the chain/collar. Do not brace the goat by grabbing the head/neck and lifting.
- Breeding goats should be shown without bracing. Keep the goat’s feet set squarely.
- Exhibitors should keep their body about 6 inches away from the goat when in line, and when not bracing.
- Avoid overstretching the goat because this causes a change to the topline.
- Reach over the goat to position the legs. If for some reason you cannot reach over, then you may reach under to position legs. Handle the goat between the hock and knee when repositioning the leg. Do not use your feet to move the goat.
- If the judge handles your goat, evaluate the animal to see if you have any need to brush the animal.
- See page diagrams (Figure 6 on page 12) on how to change positions in a line.
Goat Halters
- Cable halters are utilized in the showring for those that would like to have some more control over the goat or to just give the animal a more natural look.
- To be successful using a cable halter, the showman must be aware of where the halter is at all times from the minute they lead or pull into brace.
- When utilizing a cable halter, make sure you hold the cable high enough to maintain tension on the halter to prevent the goat from escaping. Walk with the cable halter above the goat’s head to show off their front-end design as well as to keep pressure on their head as you lead.
- When stopped and bracing, attention should be focused on head and neck placement. Do not let the halter be a distraction for yourself, the goat, or the judge.
- When the judge circles around the goat, utilize the cable halter to get off the goat to show off the front view of that animal. When the judge maneuvers around your goat to the side profile, begin bracing your goat and use your hands to secure the animal’s head.


there is slight differences in how they are holding the head with ears down (left), ears
straight (middle), or ears up (right). Work with what makes you comfortable, and makes the goat look the best. Practice to see what works for you.


Dairy Goat Showmanship
Fitting
Plan to have your animals groomed and ready to go before the show. There are always last-minute details, but it helps if the time-consuming portions of the job have been done at home. Trim hooves one to two weeks before the show. Dairy goats can be clipped from a few days up to two weeks before a show.
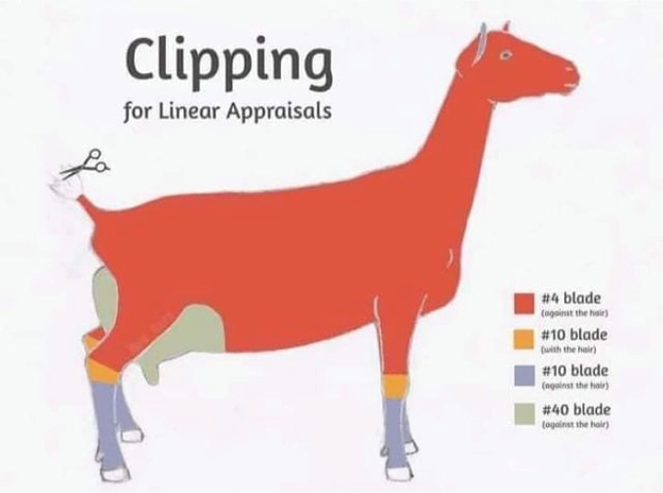
A number 4 blade is commonly used for clipping the entire body indicated in red. Move the clippers against the hair including whiskers, beard and hair inside the ears.
Trim areas around the hock (yellow) with a number 10 blade against the hair for a very fine and tight clip.
Then from the hock down (purple/lavender), continue trimming with a number 10 blade but move the clippers with the hair.
Finally, a shorter blade, such as a number 40, can be used on the udder to cut against the hair indicated in gray/cream. It is easier, and usually safer, to clip the udder when it is full of milk.
The hair on the tail is squared off below the last bone in the tail, leaving a triangular tuft of hair at the end of the tail similar to that of a paintbrush shape.
Showing
Exhibitors need to wear appropriate clothes to show their animals, such as clean jeans or slacks and a white shirt or blouse. Check the dress code for the show you are attending. Bring goats to the ringside a few minutes before the start of their class. Be ready to enter the ring as soon as the class is called. You will need to know the birthdate of each of your animals, the freshening date and number of lactations for milkers.
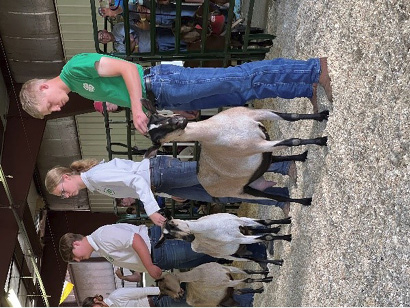
Watch the class ahead of you to better understand the judge’s procedure and preferred method of lining up animals. When it is your turn to enter the ring, lead slowly and gracefully in a clockwise direction. Leave about three feet between your goat and that of other exhibitors when walking around the ring. Leave about two feet between animals when lined up head to tail or side by side. Watch the judge and at the same time be aware of what your goat is doing.
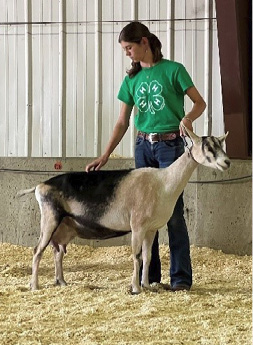
Handlers should stand off the goat for a distance with their arm extended to show the front end of the goat. Then stand square on the side profile, and move around as necessary to adjust the goat’s feet with your hand.
Hold the doe’s head high and keep the collar behind the jaw. Stand next to the withers or head. Make yourself invisible. Hold the opposite hand at your side or behind you.
The handler should squarely set legs/feet under the goat. The rear legs should be wide to show udder.
Handlers should show dairy goats with a thin feminine chain held firmly.
Practice at home before showing so you and the goat are familiar with posing and leading.
Poultry Selection and Preparation
Classes of Poultry
There are many different standardized poultry breeds you can enter into a show, including chickens, ducks, geese, turkeys, pheasants, pigeons, doves, quail and guinea. Currently, 79 breeds and 200 varieties are available. Knowing the standard requirements for the breed you choose to raise and show is critical to your success in the show and during showmanship. “The American Standard of Perfection: A Complete Description of All Recognized Varieties of Fowls” by the American Poultry Association and the “Bantam Standard” by the American Bantam Association are great investments to learn about your breed and others.
When showing, you always show according to your breed standard and color. Each breed and variety (color) has its own requirements, which are assessed by the judge assigned to that class. For example, you may have a breed that you prefer, but the color of your is not recognized by that breed standard. Therefore, that color would not meet the breed standard. As a result, some colors may be grounds for disqualification for that breed.
The most important consideration is type. This is best defined as a silhouette of your bird (what that breed “should” look like). Think of a Volkswagen Beetle and a pickup truck; they both have very distinct silhouettes. Each breed of poultry has its own silhouette, and this shape is the prime consideration of the judge. Following type is the condition and color, and finally overall body condition of your bird. If you do not have a good understanding of the breed standard, you cannot select or grow your best birds.
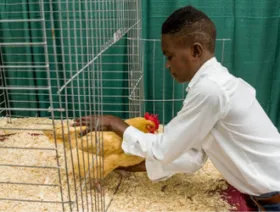
How to Handle Your Bird
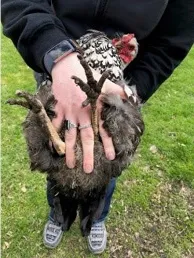
- When you are preparing your bird for a show, ensure you are holding and carrying the bird correctly. Move your dominant hand underneath the bird and place your middle and ring fingers between the legs. Place your index and pinky finger around the outside of the legs for support. Your thumb should wrap around the bird to stabilize your hand and the bird. Place your opposite hand on top of the back and wings to support the bird safely.
- Grooming is all about attention to detail. Grooming includes washing and drying, cleaning feet and shanks, cleaning around the vent area, cleaning and shining the combs and wattles, trimming the toenails and beaks – everything that helps make a bird look its best. Touch up grooming may be done at the show just before judging.
- Conditioning is a long-term investment in your bird that starts the day it hatches from a healthy parent flock. Conditioning involves doing everything in your power to ensure we grow the very best and healthiest birds possible. Feeding high-quality feed, providing fresh water, having clean pens, not overcrowding the birds as they grow and being vigilant in checking for internal and external parasites and pests are tasks of conditioning.
Preparing Your Poultry
Prepare your bird three to five days before the show.
- Banding: All poultry going to shows and/or public exhibit, regardless of age, and excluding doves and pigeons, must have a safe leg or wing band. This band helps identify the bird should it escape during the event.
- Testing: All poultry going to shows and/or public exhibit, regardless of age, and excluding doves and pigeons, must come from a National Poultry Improvement Plan (NPIP) certified Salmonella pullorum – Salmonella Typhoid (P-T) clean flock or have had a negative P-T test within 90 days prior to going to show/exhibition. A rapid plate test is a flockside test that can be used by a certified tester or veterinarian, who will need to draw blood and test it with the P-T antigen. Your Extension agent can answer questions on how to find a certified tester or might have a testing scheduled around the time of the show.
- The rapid plate test can be used in all poultry except for turkeys due to inaccurate results. Blood can be sent to the University of Minnesota Poultry Testing Laboratory by filling out the Avian Serology/Molecular Diagnostics Test Request found on its website under “Avian”: https://www.vdl.umn.edu/submission-guidelines/submission-forms-supplies.
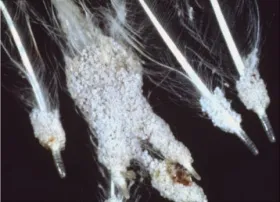
- Lice and Mites: External parasites such as lice and mites are extremely hard to eradicate, so prevention is key. The best prevention is to keep poultry, runs and equipment clean and dry. Always check your exhibition birds before and after taking them to a show because these parasites spread easily between birds. Frequently check your birds and housing for lice and mites so you can treat them if they appear. Check around the head, vent area, on the legs and back, and under the wings for signs of parasites. Signs can include red or black spots, blood, feather loss, lack in production, itchy or excessive preening, and a pale comb or wattles. Mites and lice require different treatment methods depending on what type is affecting your birds. Contact your Extension agent or veterinarian for treatment plans.
- Cage Training: Cage train your bird. Moving the bird from its original home where it is used to staying
- Limit the amount of direct sunlight that your birds have, especially if they are light colored.
- Handling Birds: Handle your birds often, especially the bird you plan to use for showmanship. Practice your showmanship routine with your bird by spreading

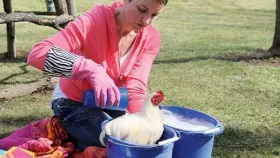
- Bathe your birds two to three days before the show. First, determine how dirty your bird is to see what type of bathing is required. If your bird is mostly clean, with only some dust or dirt on the top layer of its feathers, a damp washcloth will be sufficient. If its feathers have mud, dirt or fecal material in them, a full bath would be best. To give your bird a bath, ideally you should have two buckets or tubs. Both buckets should be filled with warm water, and one should have a very mild pet soap or baby shampoo added. First place the bird in the plain water bucket, ensuring that the feathers are damp. Then place the bird in the lukewarm
- Trimming: Trim your bird’s toenails and beak as needed. This is done with a human or dog nail clipper. Use care not to trim them too short. When trimming the nails, only trim the transparent part of the nails, a little at a time; otherwise, the nails might bleed. If they bleed, you have clipped the “quick,” which is the part of your bird’s nail that contains the blood vessel and nerves. Cover the nail with baking soda or cornstarch to stop the bleeding and gently compress the nail with a soft towel until it stops bleeding. You also can purchase “quick stop” from a pet store just in case.
Common Disqualifications
Each breed of poultry will have its own disqualifications, such as incorrect comb or wrong feather patterns. Some disqualifications cover all species and should be avoided when choosing a showmanship bird.
Head area:
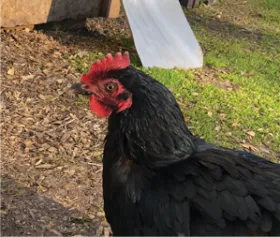
Disqualifications in the head area of a bird include frostbitten comb tips or wattles, lopped comb, crooked beak, wry neck, excessively coarse or withered wattles, or anything that goes against breed standards.
Example of a comb with frostbitten tips. (Photo provided by Sarah McNaughton)

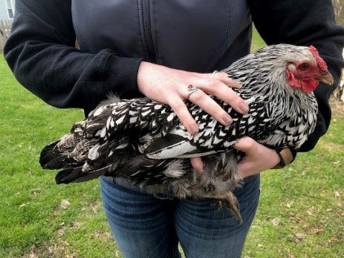
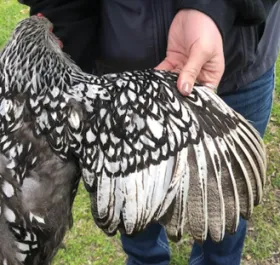
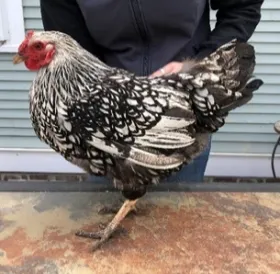
Feathers and Body:
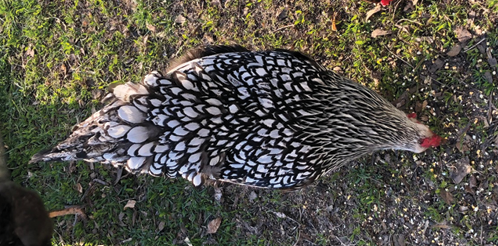
Broken feathers, incorrect feather patterns, under- or overconditioned body.
Example of incorrect vs. correct feather patterns in Silver Laced Wyandotte hens. (Photos provided by Sarah McNaughton)
Back and Rear:
Prolapsed vent, split or wry tail, missing or broken main tail or sickle feathers.
Examination of Bird
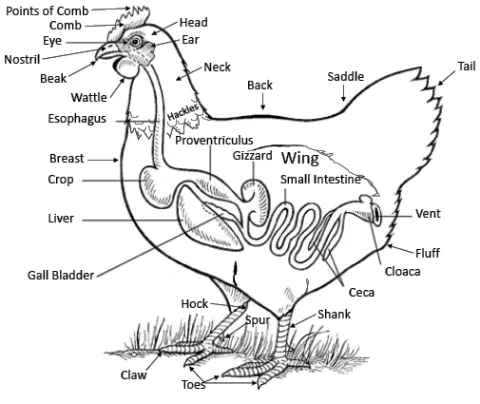
As you examine your bird, discuss with the judge what you are looking for and show how you do it. Start with the birds head and work your way back.

Head, Wattle and More
- Present the comb to the judge, name the comb and discuss how a correct comb should look for breed character and general good health. Identify any possible disqualifications that exist in your breed.
- Present the eye to the judge and why you are showing the eye. Point out that you check the eyes for any signs of blindness, foreign material or parasites, and that the eyes are clear and the full correct color (name the correct color for your breed). Identify the color appropriate for your bird and any possible disqualifications that exist in your breed.
- Present the beak to the judge. Tell the judge about the beak of your bird. Describe that it should be clean, not crooked or distended, and the type that is normal for your breed.
- Present the wattle to the judge. Identify proper color, smoothness, roundness, and other characteristics according to your breed.
- Present the ear lobes to the judge. Identify the proper color for your breed.
Wings, color pattern, condition of feathers, lice or mite damage, and vent
- Present condition and feathers to the judge. Start from the head, go to the neck and identify the hackle feathers, back and tail. Explain the color and uniformity of the feathering according to your breed. Point out any broken, missing or twisted feathers. Be sure to check for lice or mite damage prior to your showmanship presentation. Identify any possible disqualifications for your bird’s breed.
- Present the wing to the judge. Fan out the wing of your bird to the judge. You can gently fan it up and down to show it is in good condition. Describe the parts of the wing. The bird has primary flight feathers (counted from the outside in – 10), the axel feathers, the secondary flight feathers (count them to the judge), the wing bow, the wing bar, the wing primary coverts, the wing front, the wing shoulder and the wing web. Also, present the proper color pattern. Does the bird show signs of molting or Split wing?
- Present the tail to the judge. Show the spread of the tail feathers. Identify if your bird has all of its tail feathers and the condition they are in. Identify any signs of disqualifications, including proper tail carriage.
- Present the width of the body to the judge. With your palm facing toward you and your thumb on one side and fingers on the other side of your bird right behind the wing.
- Present the under-color to the judge. Brush the feathers forward toward you and back. Describe to the judge the color and its importance. The under-color is important because it determines top color.
- Present the breast and keel bone to the judge. Describe that the breast bone is important as a good indicator of the condition of the bird. Use your thumb and index finger to indicate the width. Describe the proper color and the proper under-color. Check if the bird has any signs of lice or mites. Note if your bird has any disqualifications.
- Present the sickle, hock and abdomen to the judge.
- Present the vent to the judge. Using two fingers, clear the feathers from around the vent. Show the judge that the vent is clean and clear of fecal matter and free of lice or mites.
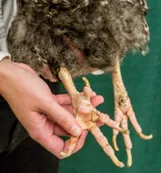
Legs, feet and toes

- Present the legs. Identify the shank and indicate if the legs are straight or not.
- Present the feet individually, showing and identifying the pads and tops. Are the toes and nails straight? Does the bird have any signs of broken bones? Talk about why you are showing the legs to the judge. Check the legs to make sure they are the correct color for the bird and to check for the correct numbers of toes. Describe what is correct for the breed you are showing. If the legs are perhaps not the proper color, explain why (egg production will cause some bleaching). Check to make sure the feet do not have scaly leg mites (you even can tell the judge what they are) or other negative qualities. You can describe how you might treat something such as mites, too. “If the bird did have leg mites, you can slather petroleum jelly on the shanks and toes to smother the mites”. Identify any possible disqualifications.
Pose Your Bird
Posing your bird will take a lot of practice to master. Practice often to ensure your bird will be ready for the show. Ideally, you want your bird to stay still, stand tall with its beak and tail up while being alert. You can gently prod at the wattles to help your bird put its head in the correct position. If possible, your bird should not lie down on the table. If necessary you are allowed to set it back up during the presentation. Tell the judge that you would like to pose your bird, set your bird up, then stand back and wait for the judge to examine your bird.
Poultry Showmanship
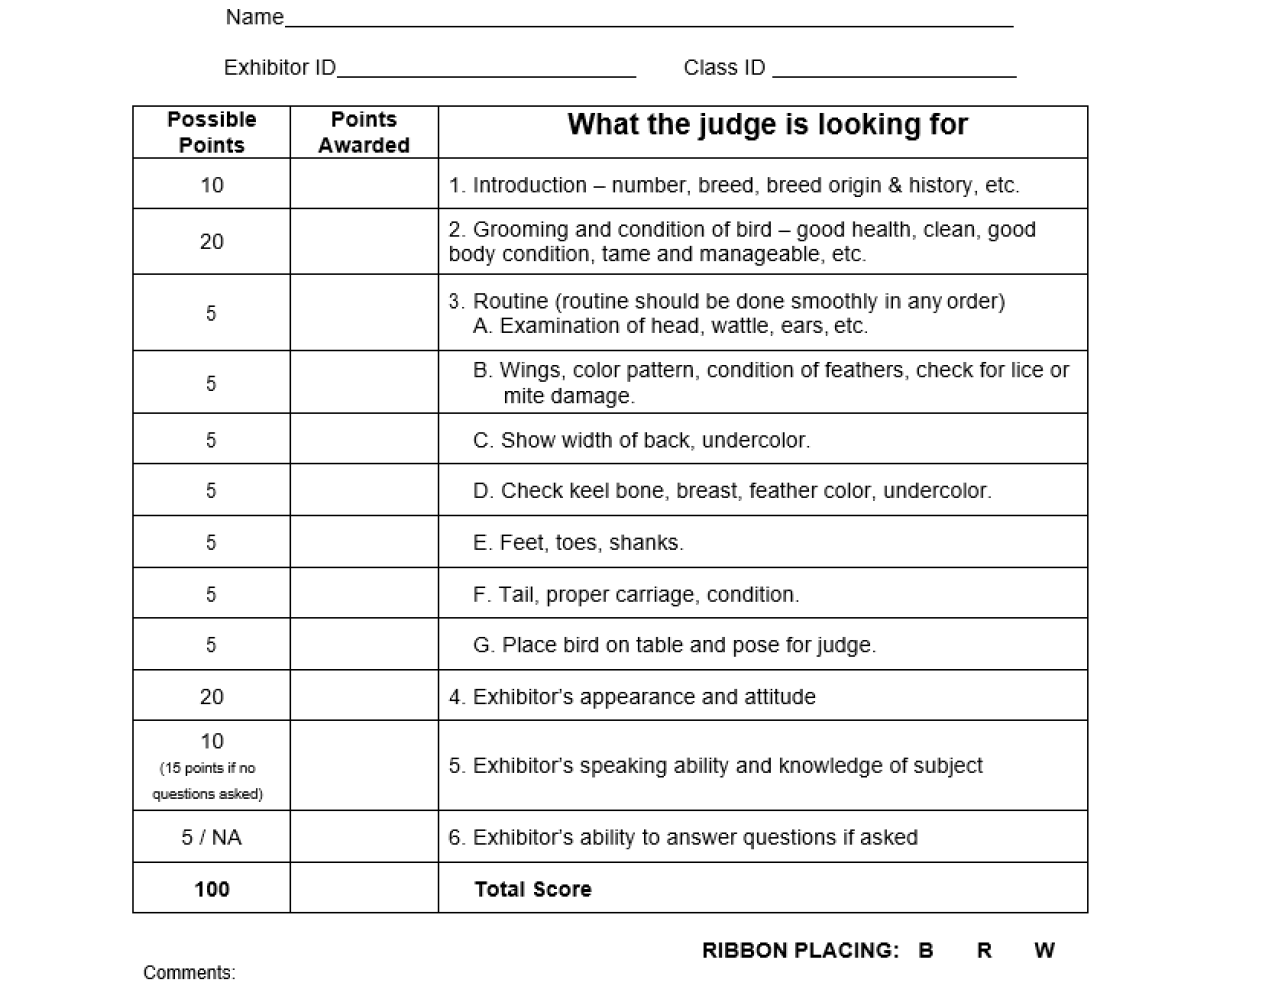
Scoresheet
The scoresheet below can be used for practicing your poultry showmanship. This scoresheet may be utilized during your show, but is not required. This scoresheet is an example of the topics to be discussed during your showmanship routine. Always follow what the judge asks of you as an exhibitor.
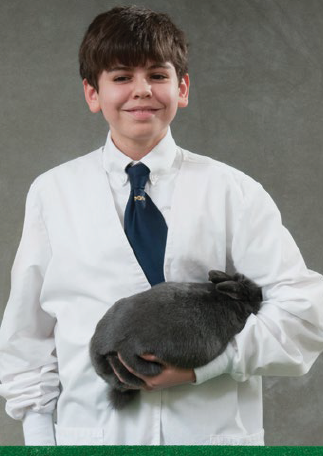
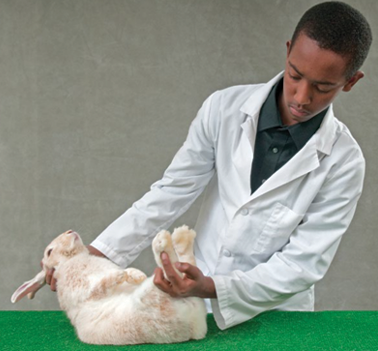
Fitting and Showing Rabbits
Fitting refers to choosing a rabbit for show and caring for it to enhance its condition and appearance. Fitting also includes any preparation of the rabbit before the contest, such as checking its general health, trimming the toenails and removing dead fur. Practicing good management techniques (such as proper animal care and cage or hutch care) will improve the health and appearance of the rabbit for show.
Condition refers to “The overall physical state of a rabbit in relation to healthy cleanliness, fur and grooming.” — American Rabbit Breeders Association. The rabbit’s condition is a sign of its health, meat and fur qualities.
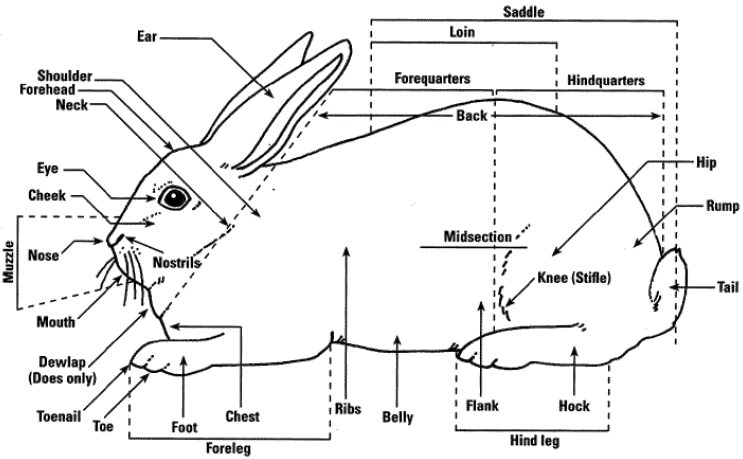
Photo used with permission of Daily Hop It: Rabbit Anatomy and Sexing.
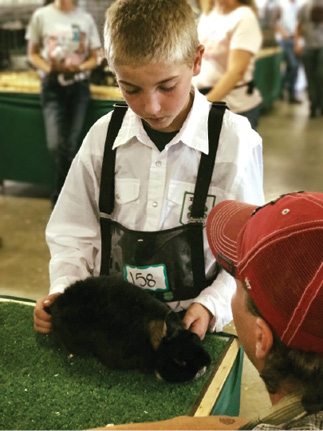
Beginning the Show
Participants are silent during the showmanship part of the competition. Only speak in response to the judge’s questions.
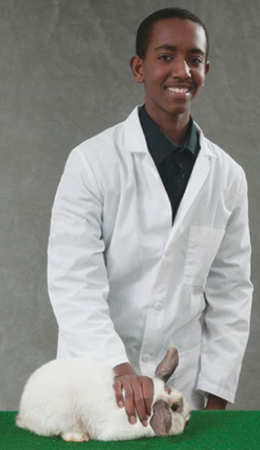
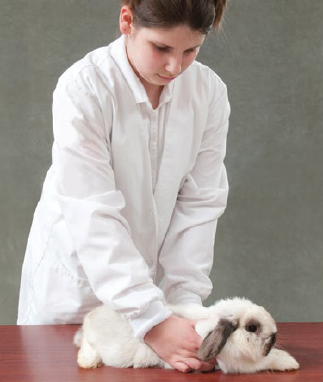
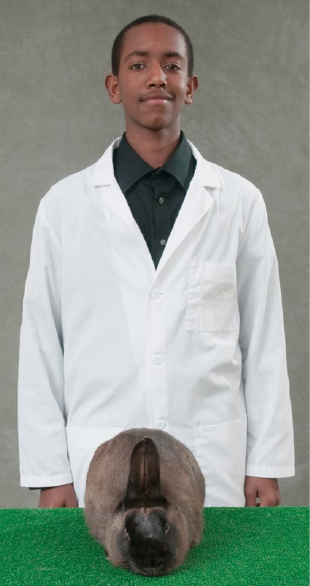
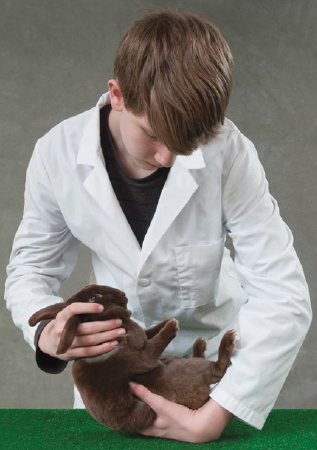
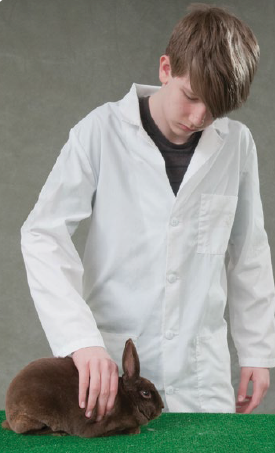
The showmanship competition begins when the judge asks you to pose your rabbit to the table (see “Posing Your Rabbit” – Figure 20, page 37).
Stand behind the table with your rabbit in front of you, facing the judge. When the judge tells you to begin by saying “handle your rabbit,” that’s your cue to perform the steps described in the “Handling Your Rabbit” section that follows.


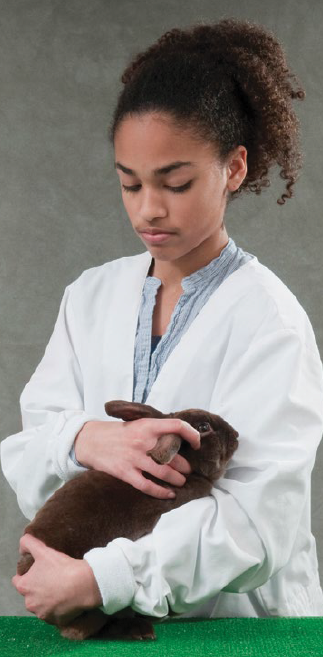
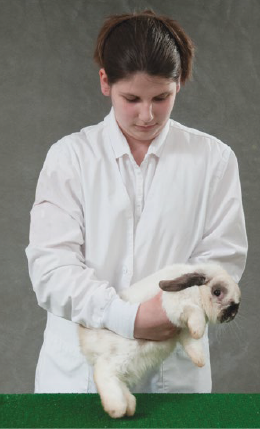
Handling Your Rabbit
Step 1.
Lifting and supporting your rabbit, turn it sideways without dragging its toenails on the table (see Figure 11).

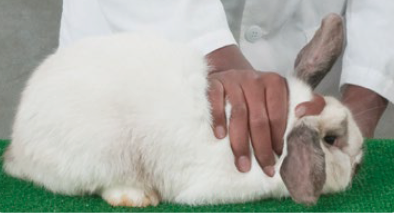
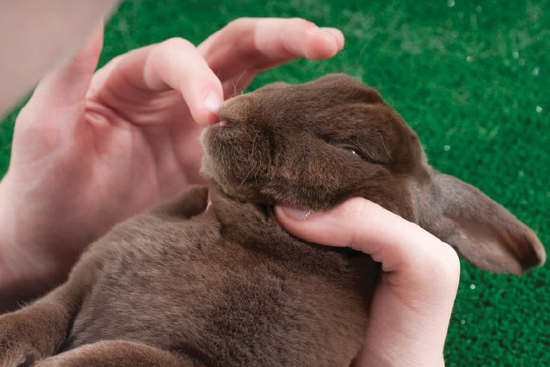
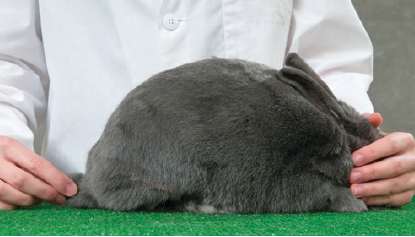
Step 2.
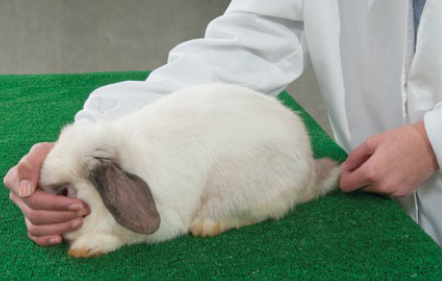
Place the palm of one hand directly in front of the rabbit’s face. Cup your other palm around the shoulders of the rabbit, directly behind the base of the ears and with your fingers in the appropriate place. (This will depend on which of the finger placement options you choose from the list that follows.) Support the animal by gently holding its shoulders with your cupped hand. If at all possible, try not to grasp the rabbit’s skin and fur (see Figure 12). This is why exhibiting a smaller rabbit is easier if your hands are small.
- Option A: Holding only one ear between your thumb and pointer finger (see Figure 13).
- Option B: Holding both ears between thumb and pointer finger (see Figure 14).
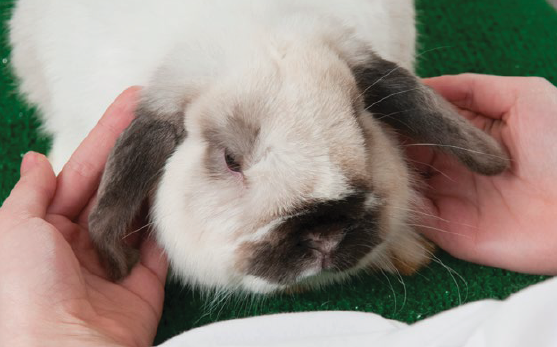
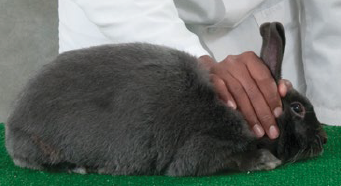 Photo Credit:Michigan State University ExtensionFigure 14. (Step 2) Holding your rabbit - Option B
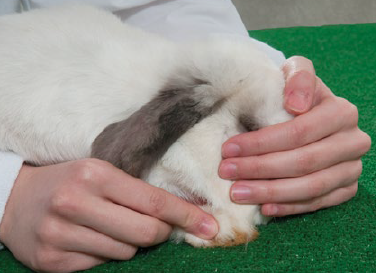
 - Option C: Holding one ear between your thumb and pointer finger and the second ear between your pointer and middle finger (see Figure 15).
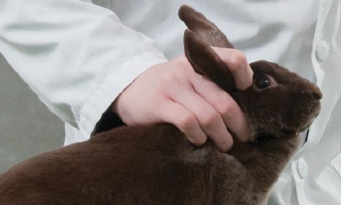 Photo Credit:Michigan State University ExtensionFigure 15. (Step 2) Holding - Option C
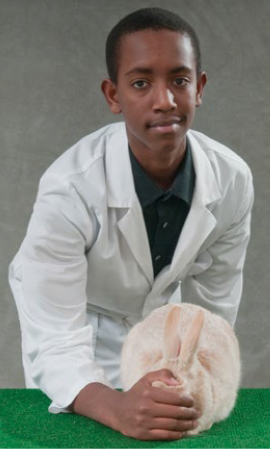
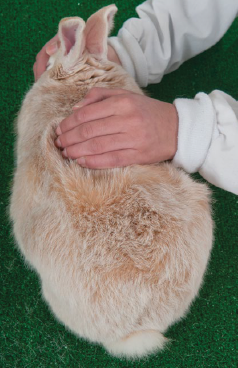
Step 3.
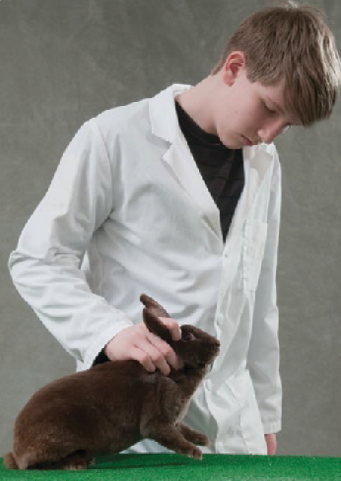
Keeping your hand cupped on the rabbit’s shoulders, lift it by the shoulder and ears, raising your hand so its front legs are slightly off the table (see Figure 16).
Step 4.
Use your other hand to support the rabbit’s lower hindquarters (see Figure 17) or gently place one hand under the chest and the other under the rump.
Step 5.
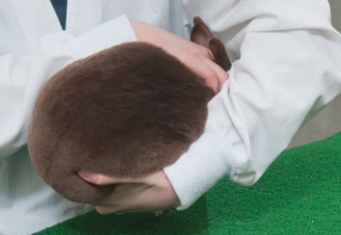
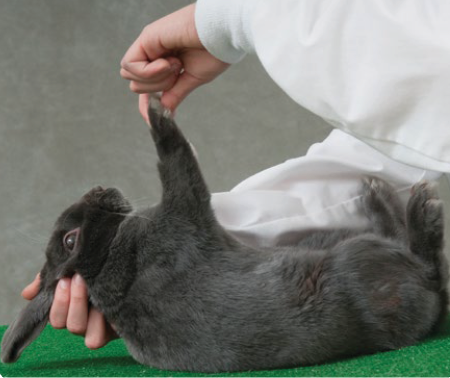
Lift the rabbit and bring it toward your body so its head is in your elbow bend. Lower your other arm to your side. In this position, the rabbit’s head is hidden in your elbow bend and the rabbit’s weight is completely resting on your arm and hand. The rabbit’s front feet should be on your forearm, and the back feet in your hand (see Figure 18).
Step 6.
After the judge instructs you to “pose your rabbit on the table,” gently return it to the table. (see Figure 19). The way to do this will depend on the size and breed of the rabbit and your size. Next, pose it facing the judge as described in “Posing Your Rabbit” (see Figure 20).
The important thing is not how fast you pick up the rabbit, but whether the judge sees the various steps you use and how well you perform them. However, don’t expect the judge to acknowledge each step as you perform it.
Posing Your Rabbit
Complete the following steps according to your rabbit’s breed standard:
Pose the rabbit facing the judge and at least 1 foot away from the rabbit on either side of it.
When you practice posing your rabbit, make sure you have a table and a rug or piece of carpet on which to place the animal. Do not try to pose the animal on a smooth surface because it will not have firm footing and may slip.
Posing Your Rabbit
Step 1. Cover rabbit’s head and eyes with your hand.
Step 2 and 3. Set each foreleg even with the eye of your rabbit.

Steps 4. Set each hind foot in line with the stifle (the back knee) of the rabbit.
Step 5. Set the tail so that it is not underneath the rabbit.
Step 6. Set the ears of your rabbit according to its breed standard.
Step 7. Smooth or fluff the fur of your rabbit according to its breed standard.
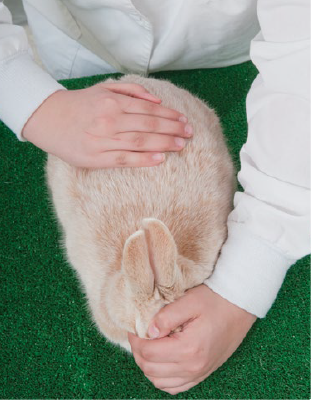
Step 8. Stand back from the table and place your arms at your sides.
Examining Your Rabbit
In the examination part of the showmanship contest, the judge will attempt to determine each participant’s knowledge of how to check the rabbit for disqualifications and quality. The judge will evaluate you on how smoothly, systematically and confidently you perform each of the examination steps. For each step, begin on the side you are most comfortable with. Be consistent and continue with the same side of the rabbit you chose throughout the exam. Your movements will be smoother and more systematic because you always start on the same side of the rabbit.
The judge will say “examine your rabbit” when it is time to begin. The examination includes the following steps:
Step 1. Lift and turn the rabbit sideways with one hand under its chest and the other hand under its rump for support. Place the rabbit sideways on the table.
Step 2. Starting with the head, gently squeeze the base of each ear one at a time.
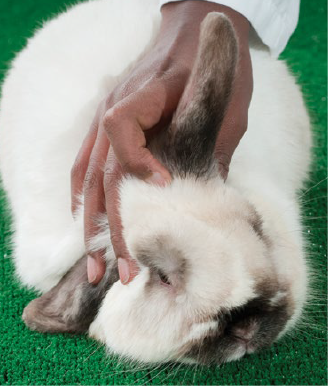
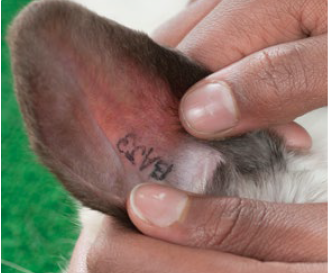
Step 3. Open and examine each ear to make sure that the rabbit does not have ear mites. Also, check for any nicks in the ears and note tattoo number if present.
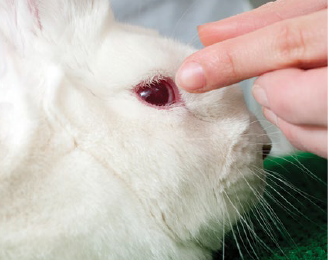
Step 4. Check your rabbit’s eyes by pointing your finger at each eye. Do not touch the eye. Do this to ensure the animal is not blind. Show the judge that your animal does not have weepy or cloudy eyes. Identify and state the correct eye color for your specific breed to the judge.
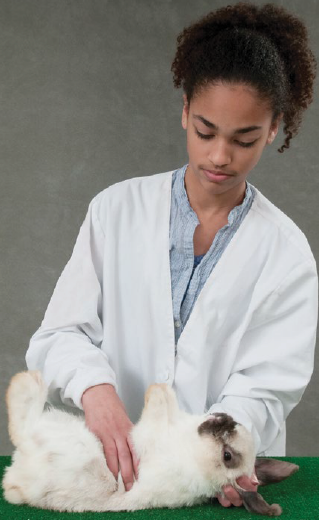
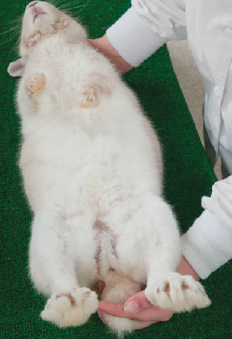
Step 5. Turn your rabbit smoothly onto its back. Place the palm of one hand directly in front of the rabbit’s face. Cup the palm of your other hand around the shoulders of the rabbit, directly behind the base of the ears. Never lift by the ears. Appropriate finger placement will depend on which finger placement option you choose. Support the animal by gently holding its shoulders with your cupped hand. Try not to grasp the skin and fur. While holding the shoulders and ears, use your opposite hand to support the rabbit’s hindquarters. Lift the front end and roll the hindquarters under. Do not let go of the shoulders. Release your hand from the rump to proceed with the exam. Make sure you provide adequate support for the rabbit when you turn it over. Do not allow the animal to struggle or kick.
Note: Turning the rabbit on its back is a very important step because the judge will observe whether the rabbit is under your control while you perform the examination. Slow and smooth movements help maintain control.
The rabbit now should be positioned with its head either to your right or to your left, depending on whether you are right- or left-handed.
Step 6. Point your index finger to the rabbit’s nose area and gently touch it to look for any discharge.
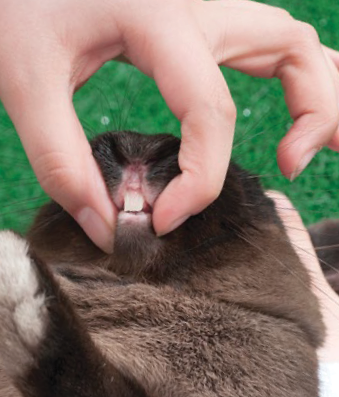
Step 7. Approaching the rabbit from above, pull back its lips with your thumb and index finger to show the judge the condition of its teeth. Talk to the judge about whether you can see any cracked, chipped, broken or buckteeth (malocclusion).
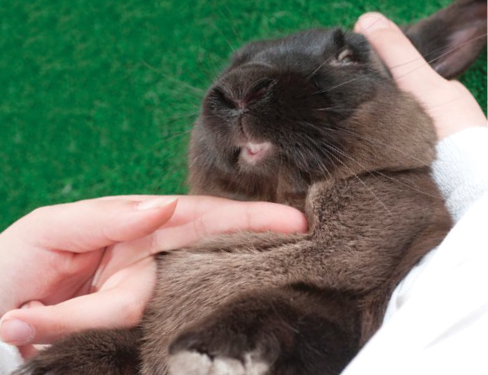
Step 8. Check the throat or dewlap area of your rabbit for abscesses or tumors by stroking under the chin with the flat backside of your finger. Describe to the judge what you are doing and what you have found.
Step 9. Gently pull each front leg up separately to see if the legs are straight, crooked or bowed.
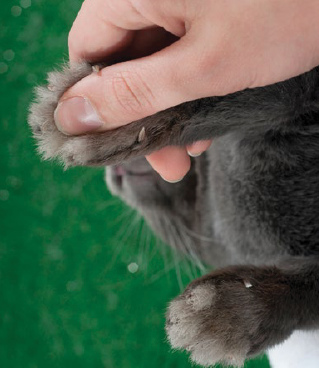
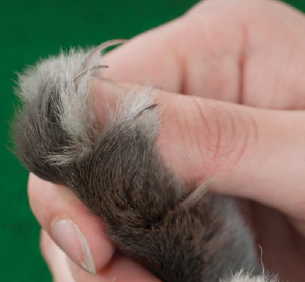
Step 10. With your thumb, gently press the footpad of your rabbit to extend the front toenails to check the color of the nails and to look for missing or broken nails. Check each toe and do not forget the dewclaw. With some breeds, you may need to pull the fur back to expose the nails.
Step 11. Cup and slide your hand over the chest and abdominal areas of your rabbit. Check for abscesses, tumors or other abnormalities. Describe what you find to the judge.
Step 12. When your cupped and sliding hand reaches the thigh area of the rabbit, gently squeeze the hind legs together to determine their straightness and note if the back legs are parallel.
Step 13. Support the hind legs of your rabbit with your hand and use your thumb to examine each hock area for signs of sore hocks. You also may grab each foot individually, as long as you use your thumb to examine it.
Step 14. With your thumb, gently push on the rear footpads to extend the toenails out so you can check the color and look for missing or broken toenails. With some breeds, you may need to pull back the fur to expose the nails.
Step 15. Check the animal’s sex by holding its tail between your pointer and middle fingers and pressing down lightly in front of the sex organ with your thumb. Examine the area for any signs of disease.
Step 16. While still holding the tail between your two fingers, slide your fingers from the base to the end of the tail to determine whether the tail has been broken.
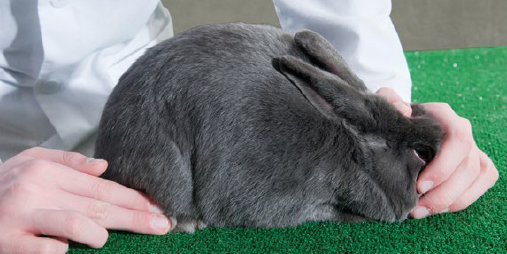
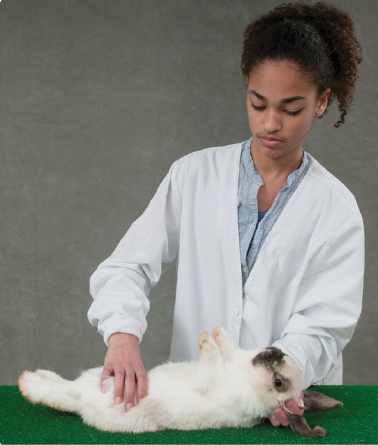
Step 17. Place your free hand under the rabbit’s rump and gently roll it back onto its feet so the rabbit is facing sideways. Cover the rabbit’s eyes to control it and keep it calm.

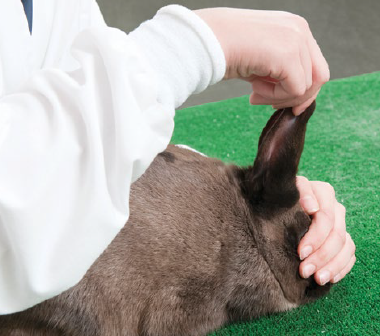
Step 18. With your free hand, gently pull the tail out and release it to examine the tail for abnormalities. Check for proper tail carriage and to be sure the rabbit does not have a wry or screw tail.
Step 19. Place the rabbit’s ears according to its breed standard, checking for proper ear carriage (pictures to the right).
Step 20. Check the quality of the animal’s body type and flesh condition by cupping your hand over the rabbit’s shoulders and slowly sliding your hand down to the base of the hindquarters.
Step 21. Examine the fur quality, texture and density of your rabbit by running your hand from the tail to the head and back to the tail.
If you have a wool breed rabbit, do not run your hand on the animal. Instead, gently fluff the wool from back to front to check the length and condition. Then gently grasp the wool on the sides of the rabbit to check the density.
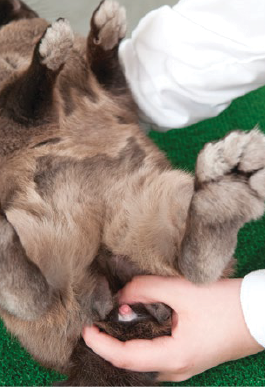
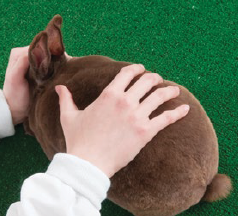
If you have a rex-furred rabbit as pictured with the dark brown fur, gently press into the fur to check for resistance and then release your hand.
Step 22. Pose the rabbit facing forward and stand with your hands at your sides. This completes the examination.
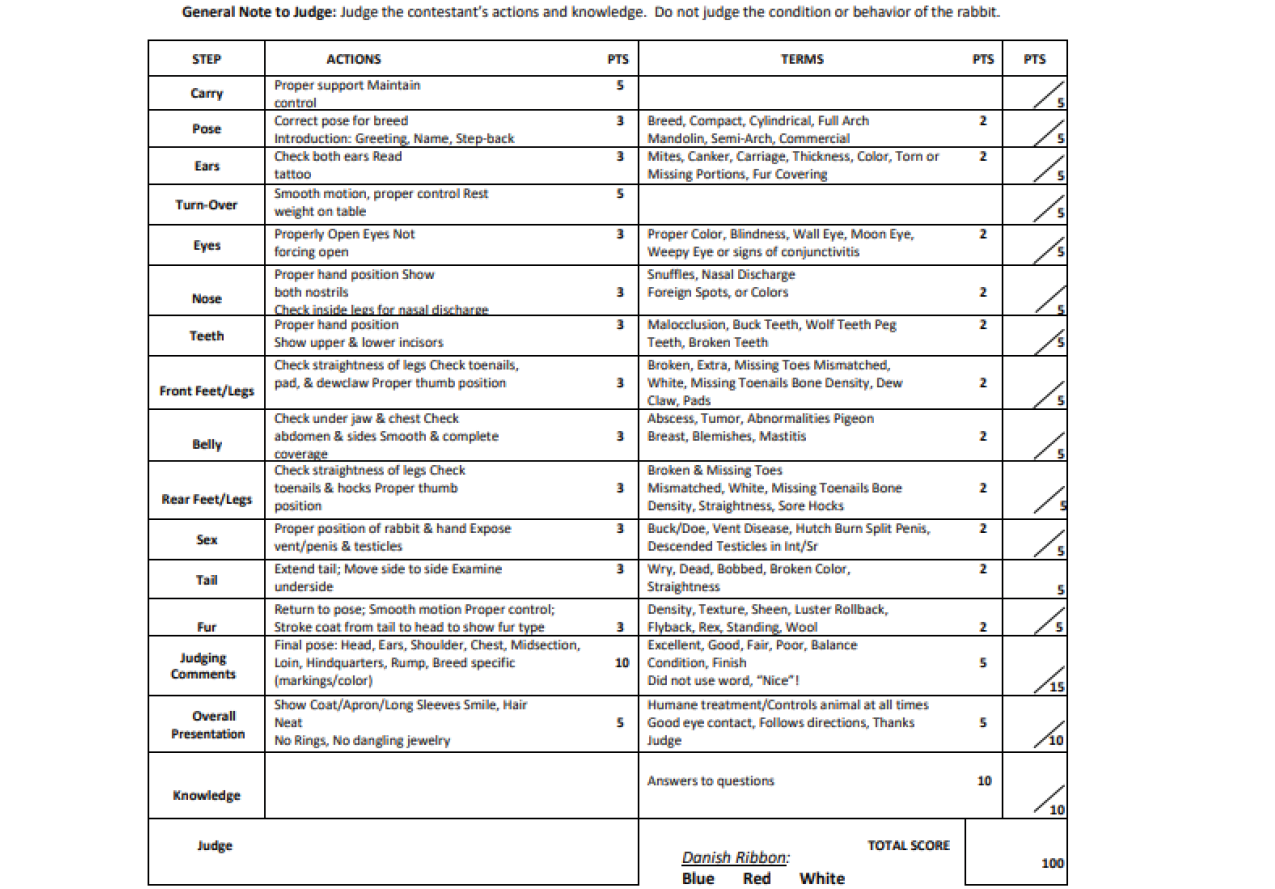
Scoresheet
This score sheet may be used to prepare for rabbit showmanship. This scoresheet is not required, rather, a tool to use as a judge or exhibitor to prepare what you need to cover when talking about your 4-H rabbit exhibit with the judge. Practice going through these topics with your friends and family to work on your public speaking and communication skills.
4-H Thriving Model
Youth who experience high quality developmental settings in 4-H with an emphasis on these key social-emotional skills achieve key positive youth development outcomes, including academic motivation and success, social competence, high personal standards, connection with others, personal responsibility, and contribution to others through leadership and civic engagement.

North Dakota 4-H Livestock Showmanship Guide
The NDSU Extension Service does not endorse commercial products or companies even though reference may be made to tradenames, trademarks or service names.
NDSU encourages you to use and share this content, but please do so under the conditions of our Creative Commons license. You may copy, distribute, transmit and adapt this work as long as you give full attribution, don’t use the work for commercial purposes and share your resulting work similarly. For more information, visit www.ag.ndsu.edu/agcomm/creative-commons.
For more information on this and other topics, see www.ndsu.edu/4h
County commissions, North Dakota State University and U.S. Department of Agriculture cooperating. North Dakota State University does not discriminate on the basis of age, color, gender expression/identity, genetic information, marital status, national origin, physical and mental disability, pregnancy, public assistance status, race, religion, sex, sexual orientation, or status as a U.S. veteran. Direct inquiries to: Vice Provost for Faculty and Equity and Title IX/ADA Coordinator, Old Main 201, 701-231-7708. This publication will be made available in alternative formats for people with disabilities upon request, 701-231-7881.