View Unofficial Transcripts (Staff)
Campus Connection Help for Faculty & Staff
VIEW STUDENT TRANSCRIPTS
- Single or Small-Group Transcript Reports (only sorted by Student ID)
- Batch (Large-Group) Transcript Reports (option to sort by Last Name)
Single or Small-Group Transcript Reports:
- Log in to Campus Connection
- Navigate to Student Records
- Click on Request Transcript Report
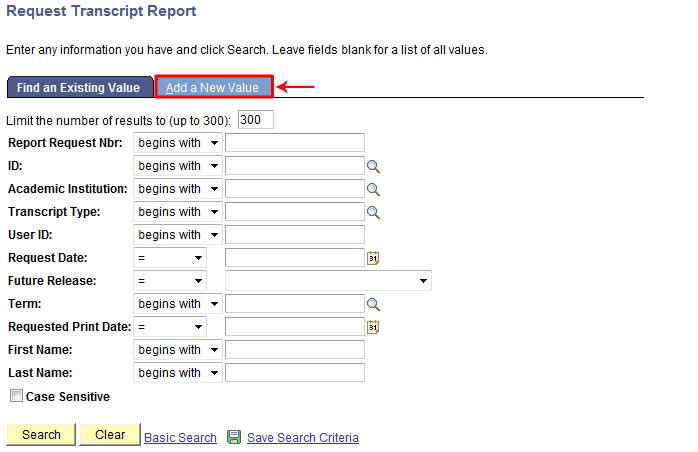
- Click on the "Add a New Value" tab
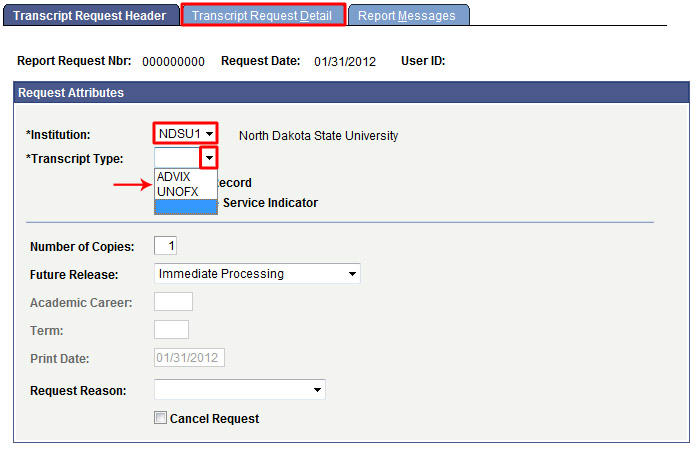
- Confirm Institution is "NDSU1", select Transcript Type (ADVIX = advising, UNOFX = unofficial), and click on the Transcript Request Detail tab
- Enter one or more Student IDs (add or remove students using the [+] and [-] buttons) and click the [Process Request] button
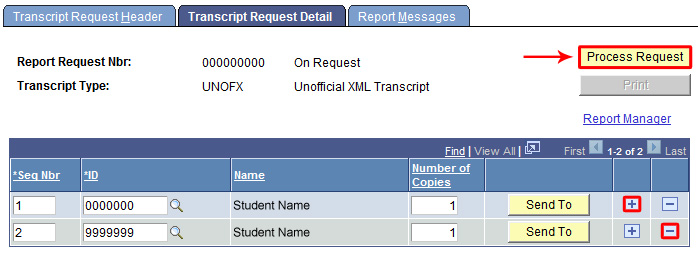
Note: Using the print button will sort the transcripts by Student ID regardless of the order they were entered.
- When processing is complete, you can either click on the “View Report” link to view each transcript separately or click the [Print] button to send all processed transcripts from this run to a single PDF file.
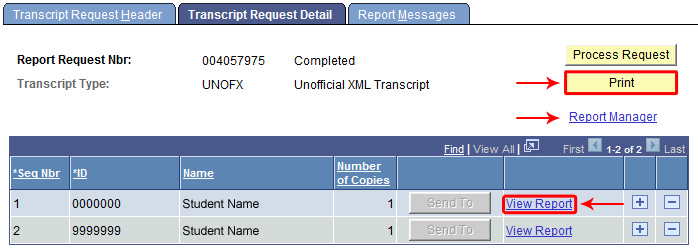
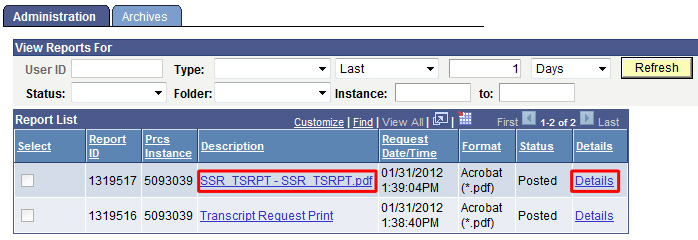
- If you clicked the [Print] button, you can view the combined PDF file by clicking on the “Report Manager” link. It will take some time to process, so periodically click the [Refresh] button.

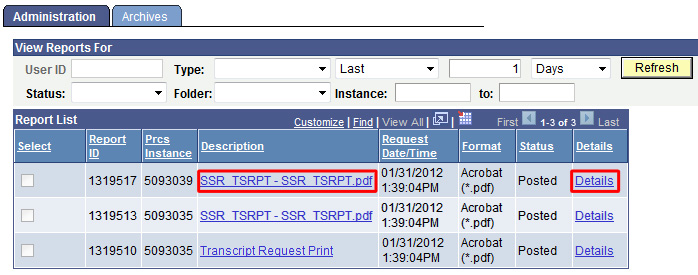
- When the combined PDF has generated, you will have a second posted file with a “.pdf” extension. You can access the file by either clicking on the File Name (ending with ".pdf") under the Description header or the "Details" link to view the transcript report.
Batch Transcript Reports:
- Log in to Campus Connection
- Navigate to Student Records Tile OR Navigator > Records and Enrollment > Transcripts > Batch Transcripts > Process Transcripts
- Click on Process Transcripts
- Run a search on the "Find an Exisiting Value" tab to use an existing Run Control -OR- If this is the first time you have run batch XML transcripts, you will need to create a Run Control by clicking on the “Add a New Value” tab, entering the name for your Run Control, and then clicking the [Add] button. (Otherwise, run a search on the "Find an Exisiting Value" tab to use an existing Run Control.)

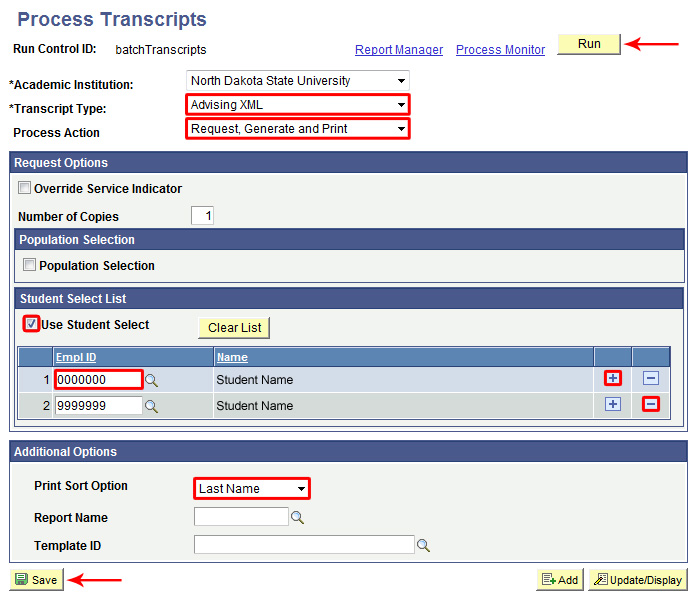
- On the Process Transcripts screen, select the Transcript Type (Advising XML or Unofficial XML Transcript), and select “Request, Generate and Print” for the Process Action
- IF YOU ARE MANUALLY ENTERING STUDENT IDs FOR RUNNING TRANSCRIPTS:
- Check the “Use Student Select” check box and enter the EmplID’s manually, click the [+] or [-] buttons to add or remove students from the list
- Choose your preferred “Print Sort Option” (Student ID, Last Name, or Zip/Postal Code)
- IF YOU ARE UPLOADING A FILE FOR RUNNING TRANSCRIPTS:
- Check the “Population Selection” check box and then choose “External File” from the Selection Tool drop-down to display the upload button
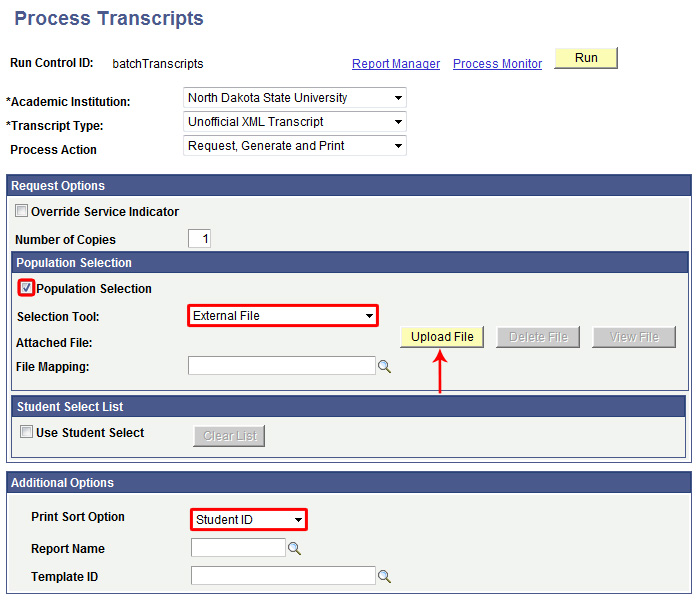
- Click the [Upload File] button, Browse your file system for the desired transcript file (in CSV format), and then click [Upload] to load the file

Note: Only files saved with a .CSV (comma-separated) file extension will work for uploading. You must ensure that you have a header row, that the Student IDs all have 7 digits, and that the Student IDs are all in the first column with no missing entries.
- Select “TRANSCRIPT FILE” for the File Mapping and if desired, click on the “Preview Selection Results” link to see the list of IDs selected for transcript generation. You may also choose to change your sort option to sort the transcripts by last name if you would like.
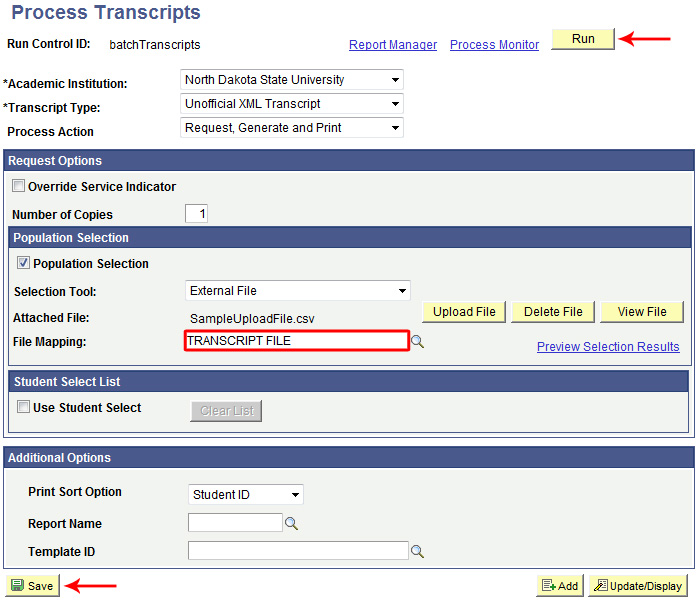
- Check the “Population Selection” check box and then choose “External File” from the Selection Tool drop-down to display the upload button
- IF YOU ARE MANUALLY ENTERING STUDENT IDs FOR RUNNING TRANSCRIPTS:
- Click the [Save] button and then click [Run] and you will be taken to the Process Scheduler Request page. Click [OK] to process the request.
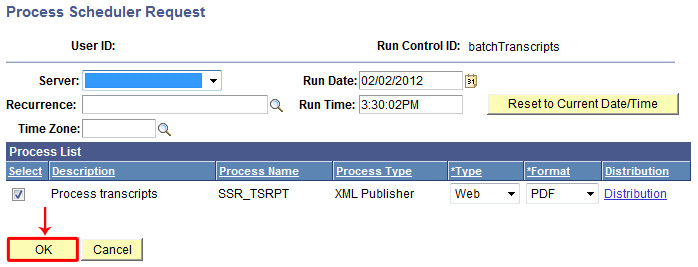
- You will then be taken back to your Run Control. You can check on the status of your transcript request through the “Report Manager” link. You can click on [Refresh] to verify the process has posted then click on the File Name (ending in ".pdf") under the Description field or the “Details” link to view the transcript report.
